Ever wondered how to use remote IoT behind a firewall on your Mac without losing your mind? If you're diving into the world of IoT (Internet of Things), you're probably already aware that firewalls can be a real pain when it comes to accessing remote devices. But don't sweat it—we’ve got your back! In this article, we’ll break down the process step by step, ensuring you stay ahead of the curve while keeping your setup secure.
So, why is it so crucial to figure out how to use remote IoT behind a firewall on your Mac? Well, let’s face it—firewalls are there for a reason. They protect your network from unwanted intrusions, but they can also block legitimate connections if not configured properly. This guide will help you navigate through the complexities and ensure your IoT devices remain accessible without compromising security.
Whether you’re managing smart home devices, industrial sensors, or any other IoT setup, this article will provide practical tips and actionable advice. Let’s jump right into it and make sure you’re not stuck scratching your head when troubleshooting your IoT network!
Read also:Unveiling The Thrill Adventure Activities Chapel Hill
Table of Contents
- Understanding Firewalls and IoT
- Hardware Requirements for Remote IoT
- Software Setup on Mac
- Configuring Your Firewall
- Ensuring Security
- Common Issues and Troubleshooting
- Optimizing IoT Performance
- Automating IoT Connections
- Leveraging Cloud Services
- Wrapping It Up
Understanding Firewalls and IoT
Before we dive deep into the nitty-gritty of using remote IoT behind a firewall, let’s first understand what we’re dealing with here. A firewall is essentially a security system that monitors and controls incoming and outgoing network traffic. It acts as a barrier between your trusted internal network and the untrusted external world.
Now, IoT devices are all about connectivity. They’re designed to communicate with each other and with central servers to provide real-time data and insights. But when you throw a firewall into the mix, things can get tricky. The firewall might block these communications if it doesn’t recognize them as legitimate.
So, how do you strike a balance? The key is understanding your firewall’s rules and configuring them to allow IoT traffic while still maintaining security. It’s like letting your friends into a party without letting random strangers crash it.
Why Firewalls Are Important for IoT
Firewalls play a vital role in protecting your IoT devices from unauthorized access. Without proper firewall configuration, your devices could be vulnerable to attacks, data breaches, or even malware infections. Think of it as locking the door to your house—it’s an essential step in keeping everything safe and secure.
Hardware Requirements for Remote IoT
Before you start configuring your firewall, it’s important to ensure that your hardware is up to the task. Here’s a quick checklist of what you’ll need:
- Mac Computer: A reliable Mac with sufficient processing power and storage capacity.
- IoT Devices: Whether it’s a smart thermostat, security camera, or industrial sensor, make sure your devices are compatible with your network.
- Router: A router capable of handling multiple devices and supporting advanced firewall settings.
- Network Cables: For wired connections, ensure you have the necessary cables for stable communication.
Having the right hardware is half the battle. Without a solid foundation, even the best software setup won’t save you.
Read also:Streameastic Your Ultimate Guide To Streaming Made Simple
Choosing the Right IoT Devices
When selecting IoT devices, consider factors like compatibility, security features, and ease of integration. Devices that support encryption and have built-in firewalls are always a plus. It’s also worth checking if the manufacturer offers regular firmware updates to keep your devices secure.
Software Setup on Mac
Now that you’ve got your hardware ready, it’s time to move on to the software side of things. Your Mac will act as the control center for managing your IoT devices. Here’s how you can set it up:
First, make sure your Mac is running the latest version of macOS. This ensures you have access to all the latest features and security patches. Next, install any necessary software for managing your IoT devices. This could include apps provided by the device manufacturer or third-party tools like MQTT clients for messaging.
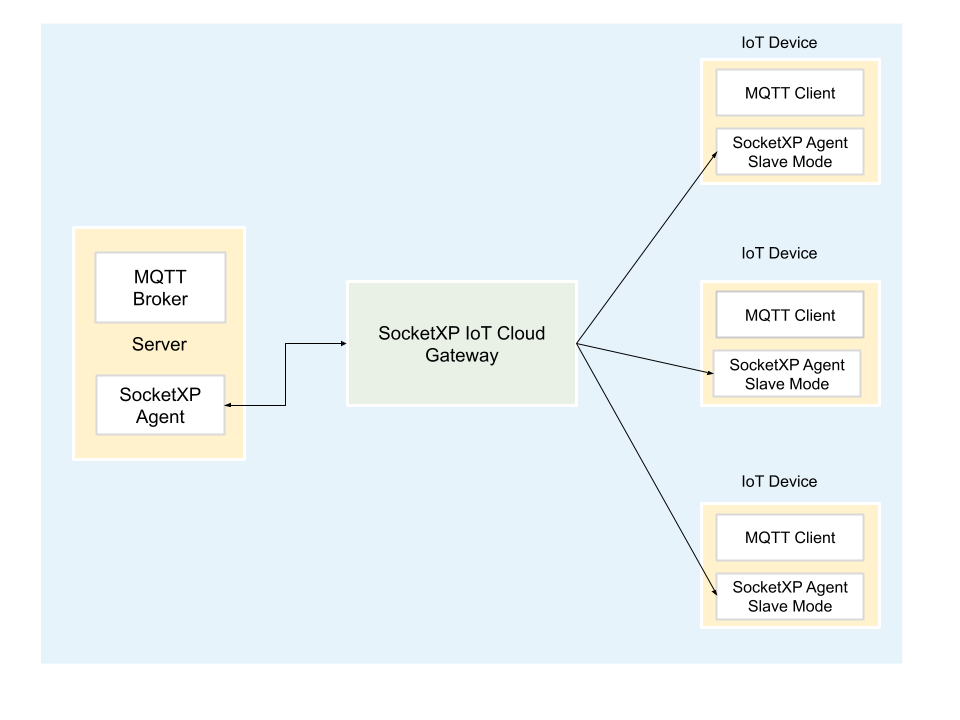
Setting Up MQTT on Mac
MQTT (Message Queuing Telemetry Transport) is a lightweight protocol commonly used for IoT communication. To set it up on your Mac:
- Install an MQTT broker like Mosquitto.
- Configure the broker to listen on a specific port (e.g., 1883).
- Test the connection using an MQTT client app.
With MQTT in place, your IoT devices can communicate seamlessly, even behind a firewall.
Configuring Your Firewall
Now comes the tricky part—configuring your firewall to allow IoT traffic. Most firewalls have settings that let you specify which types of traffic are allowed. Here’s how you can do it:
Access your router’s admin panel and navigate to the firewall settings. Look for options like port forwarding, DMZ (De-Militarized Zone), or application filtering. These settings allow you to define rules for specific types of traffic.
Port Forwarding for IoT
Port forwarding is a common technique used to allow external access to devices on your local network. To set it up:
- Identify the ports used by your IoT devices (e.g., MQTT uses port 1883).
- Log in to your router and go to the port forwarding section.
- Enter the internal IP address of your IoT device and the corresponding port number.
With port forwarding configured, your IoT devices will be accessible from outside your network.
Ensuring Security
Security should always be a top priority when working with IoT devices. Here are some best practices to keep your setup secure:
- Use Strong Passwords: Avoid using default passwords for your devices and router.
- Enable Encryption: Ensure all communication between devices is encrypted.
- Regularly Update Firmware: Keep your devices and router firmware up to date.
- Monitor Activity: Keep an eye on your network for any suspicious activity.
By following these practices, you can minimize the risk of unauthorized access and ensure your IoT setup remains secure.
Two-Factor Authentication (2FA)
Implementing two-factor authentication adds an extra layer of security to your IoT devices. Even if someone manages to guess your password, they’ll still need the second factor (e.g., a code sent to your phone) to gain access.
Common Issues and Troubleshooting
Even with the best setup, issues can still arise. Here are some common problems and how to fix them:
Problem: Devices not connecting to the network.
Solution: Check the network settings on your devices and ensure they’re configured correctly. Restart your router if necessary.
Problem: Firewall blocking legitimate traffic.
Solution: Review your firewall rules and adjust them to allow the necessary traffic. Double-check port forwarding settings.
Using Ping to Test Connectivity
Ping is a simple yet effective tool for testing network connectivity. To use it:
- Open Terminal on your Mac.
- Type
ping [device IP address]and press Enter. - Check for successful responses indicating connectivity.
If the ping fails, there may be an issue with the device or network configuration.
Optimizing IoT Performance
To get the most out of your IoT setup, it’s important to optimize performance. Here are some tips:
- Minimize Latency: Place your devices close to the router to reduce signal interference.
- Use Quality-of-Service (QoS): Prioritize IoT traffic to ensure smooth communication.
- Monitor Bandwidth Usage: Keep an eye on how much data your devices are using to avoid overloading your network.
By optimizing your setup, you’ll enjoy faster and more reliable IoT communication.
Bandwidth Management
Managing bandwidth is crucial, especially if you have multiple IoT devices. Use your router’s QoS settings to allocate bandwidth based on device priority. This ensures critical devices always have enough resources to function properly.
Automating IoT Connections
Automation can save you time and effort by handling repetitive tasks. Here’s how you can automate IoT connections:
- Use Scripts: Write scripts to automate device discovery and configuration.
- Leverage APIs: Many IoT platforms offer APIs that allow you to automate tasks programmatically.
- Schedule Tasks: Use tools like cron jobs to schedule regular maintenance tasks.
With automation in place, you can focus on more important tasks while your IoT setup runs smoothly in the background.
Using Home Assistant for Automation
Home Assistant is a popular open-source platform for automating IoT devices. It allows you to create custom automations and integrate with a wide range of devices. Check it out if you’re looking to take your automation game to the next level.
Leveraging Cloud Services
Cloud services can enhance your IoT setup by providing additional storage, processing power, and analytics capabilities. Here’s how you can leverage them:
- Data Storage: Use cloud storage to store device data for later analysis.
- Remote Access: Access your devices from anywhere using cloud-based dashboards.
- Analytics: Utilize cloud-based analytics tools to gain insights from your IoT data.
By integrating cloud services, you can unlock the full potential of your IoT setup.
Security Considerations for Cloud Services
When using cloud services, security should always be a concern. Ensure your data is encrypted both in transit and at rest. Choose reputable providers that prioritize security and compliance.
Wrapping It Up
In conclusion, using remote IoT behind a firewall on your Mac doesn’t have to be a headache. By understanding firewalls, configuring your hardware and software properly, and following best practices for security, you can create a robust and secure IoT setup.
We’ve covered everything from hardware requirements to automation and cloud integration. Now it’s your turn to put this knowledge into action. Remember to stay vigilant and keep your setup updated to ensure maximum performance and security.
Feel free to leave a comment below if you have any questions or share this article with others who might find it helpful. Happy IoT-ing!