Are you tired of being stuck with limited access to your IoT devices? Do you want to know how to use SSH IoT from anywhere, even when you're on a Mac, and without breaking the bank? Well, you're in the right place, my friend. In this guide, we'll dive deep into everything you need to know about SSH IoT access, whether you're a tech enthusiast or just someone looking to simplify their life.
Imagine this: you're chilling at a café, sipping your latte, and suddenly you realize you need to check something on your IoT-enabled home security system. Panic sets in because you thought it was impossible to access it from outside your local network. But guess what? SSH can be your savior. It’s like having a superpower that lets you connect to your devices no matter where you are.
Now, before we get into the nitty-gritty details, let me assure you that this guide is beginner-friendly. You don't have to be a coding wizard or spend a fortune to make this work. We'll walk you through the process step by step, so by the end of this article, you'll feel confident enough to set up SSH IoT access from anywhere, even on a Mac, for free. So, grab your favorite snack, and let's get started!
Read also:Koa East Gatlinburg Your Ultimate Guide To Naturersquos Paradise
What Is SSH and Why Should You Care?
SSH, or Secure Shell, is like the secret handshake of the internet world. It’s a protocol that allows you to securely access remote computers or devices over a network. Think of it as a secure tunnel that keeps your data safe while traveling through cyberspace. And hey, who doesn’t love a little extra security these days, right?
When it comes to IoT devices, SSH becomes even more important. These devices often lack robust security features, making them prime targets for hackers. By using SSH, you can protect your data and ensure that only authorized users can access your devices. Plus, it’s super handy for managing multiple devices from one location, which is perfect if you're a tech-savvy multitasker.
Why SSH Is a Must-Have for IoT Enthusiasts
- Enhanced security for your IoT devices
- Remote access from anywhere in the world
- Free and open-source tools available
- Compatible with a wide range of devices, including Macs
And the best part? You don’t need any fancy hardware or expensive software to get started. All you need is a bit of patience and a willingness to learn. Trust me, it’s worth it!
How to Use SSH IoT from Anywhere Login Mac Free
Now that you understand the basics of SSH, let's dive into the practical side of things. Here’s how you can set up SSH IoT access from anywhere, even on a Mac, without spending a dime. Follow these steps carefully, and you'll be up and running in no time.
Step 1: Set Up Your IoT Device
Before you can SSH into your IoT device, you need to make sure it’s properly set up. This usually involves installing the necessary software and configuring the network settings. Don’t worry if this sounds complicated—most IoT devices come with user-friendly interfaces that walk you through the process.
Some popular IoT platforms, like Raspberry Pi or Arduino, even have pre-built images that you can download and install. Just make sure to follow the manufacturer’s instructions carefully to avoid any issues.
Read also:Verizon Fios Isp The Ultimate Guide To Americas Premier Internet Service
Step 2: Enable SSH on Your Device
Once your IoT device is up and running, the next step is to enable SSH. This process varies depending on the device you’re using, but generally, it involves navigating to the settings menu and toggling the SSH option on. For example, if you’re using a Raspberry Pi, you can enable SSH by running the following command in the terminal:
sudo raspi-config
From there, select Interfacing Options > SSH > Enable. Simple, right?
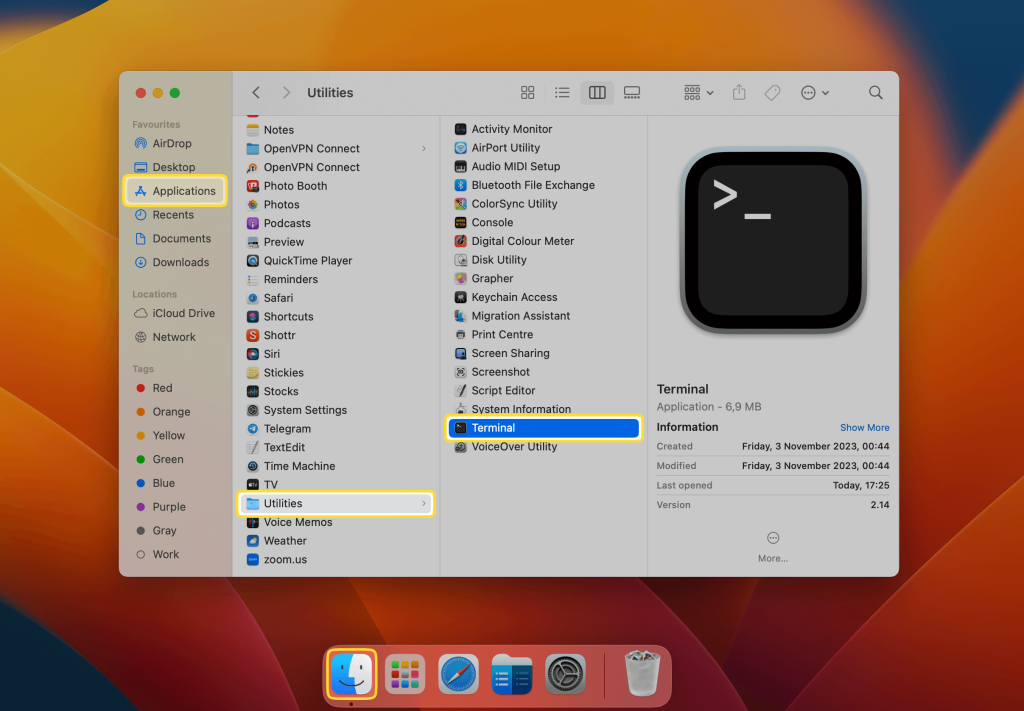
Step 3: Install an SSH Client on Your Mac
Now that your IoT device is ready, it’s time to set up your Mac. Luckily, macOS comes with a built-in SSH client, so you don’t need to download anything extra. All you need to do is open the Terminal app, which you can find in the Utilities folder or by using Spotlight Search.
Once you have the Terminal open, you can connect to your IoT device by typing the following command:
ssh username@ip_address
Replace "username" with the username for your IoT device and "ip_address" with the device’s IP address. If you’re not sure what these are, don’t worry—we’ll cover that in the next section.
Step 4: Find Your IoT Device’s IP Address
Knowing your IoT device’s IP address is crucial for establishing an SSH connection. There are a few ways to find this information, depending on your setup. One easy method is to log into your router’s admin page and look for a list of connected devices. Your IoT device should be listed there, along with its IP address.
Alternatively, you can use a network scanning tool like Fing to discover all the devices on your network. Just download the app, scan your network, and voilà—you’ll have all the info you need.
Troubleshooting Common SSH Issues
Even with the best-laid plans, things can sometimes go wrong. If you’re having trouble connecting to your IoT device via SSH, don’t panic. Here are a few common issues and how to fix them:
- Connection Refused: This usually means that SSH isn’t enabled on your IoT device. Double-check your settings and make sure the service is running.
- Incorrect IP Address: If you’re entering the wrong IP address, the connection won’t work. Use a network scanning tool to verify the correct address.
- Authentication Failed: Make sure you’re using the correct username and password for your IoT device. If you’ve forgotten them, you may need to reset the device.
Still stuck? Don’t hesitate to reach out to the community for help. There are tons of forums and groups dedicated to SSH and IoT, where you can find answers to just about any question.
Advanced Tips for SSH IoT Access
Once you’ve mastered the basics of SSH IoT access, you might want to explore some advanced techniques to make your life even easier. Here are a few ideas to consider:
Tip 1: Use SSH Keys for Passwordless Login
Tired of typing in your username and password every time you want to connect to your IoT device? SSH keys can save you a ton of time. By setting up public and private keys, you can log in automatically without needing to enter credentials.
Here’s how to create an SSH key on your Mac:
ssh-keygen -t rsa -b 4096
Follow the prompts to save the key and set a passphrase. Then, copy the public key to your IoT device using the following command:
ssh-copy-id username@ip_address
That’s it! From now on, you’ll be able to log in with just a single command.
Tip 2: Set Up Port Forwarding for Remote Access
Want to access your IoT device from anywhere in the world, not just your local network? Port forwarding is the way to go. This involves configuring your router to direct incoming traffic on a specific port to your IoT device’s IP address.
While the exact steps vary depending on your router model, most involve logging into the admin page, navigating to the port forwarding section, and entering the necessary details. Be sure to choose a unique port number to avoid conflicts with other services.
The Benefits of SSH IoT Access
Now that you know how to use SSH IoT from anywhere, let’s talk about why it’s such a game-changer. Here are just a few of the benefits you can enjoy:
- Increased Productivity: With remote access, you can manage your IoT devices from anywhere, saving you time and effort.
- Improved Security: SSH encrypts all data transmitted between your devices, keeping your information safe from prying eyes.
- Cost-Effective: Since SSH is free and open-source, you don’t have to spend a fortune on expensive software or hardware.
Plus, once you’ve set everything up, maintaining your SSH IoT access is a breeze. It’s like having a personal assistant that works for you 24/7.
Conclusion: Take Control of Your IoT Devices Today
So there you have it—everything you need to know about how to use SSH IoT from anywhere, even on a Mac, for free. By following the steps outlined in this guide, you can unlock the full potential of your IoT devices and take control of your smart home setup.
Remember, the key to success is practice and patience. Don’t be afraid to experiment with different techniques and tools until you find what works best for you. And if you ever get stuck, don’t hesitate to ask for help. The tech community is full of friendly folks who are more than happy to lend a hand.
Now it’s your turn. Are you ready to level up your IoT game? Let us know in the comments below, and don’t forget to share this article with your friends and family. Together, we can make the world a smarter, safer place—one device at a time!
Table of Contents