Listen up, tech enthusiasts! If you've been diving into the world of IoT (Internet of Things) or managing remote devices, then you're probably hearing the buzz around remoteIoT device SSH. Whether you're a developer, a hobbyist, or just someone who wants to level up their tech skills, mastering SSH for remote IoT devices is like unlocking a superpower. This protocol isn't just about connecting; it's about securing your connections, automating tasks, and ensuring your devices stay safe in an increasingly connected world. So, if you're ready to get your hands dirty (in a good way), let's jump right into it!
Now, before we dive deep into the nitty-gritty, let me break it down for you. SSH (Secure Shell) is more than just a protocol; it's a lifeline for anyone managing remote devices. It provides secure access to IoT devices, encrypts communication, and ensures that your data stays private. With more and more devices going online, the risk of cyber threats is real, and SSH is your best defense. This tutorial is designed to walk you through every step, from setting up SSH on your IoT device to troubleshooting common issues.
Here's the deal: this isn't just another generic guide. We're going to break it down step by step, with real-world examples and practical tips that you can apply right away. Whether you're a total beginner or someone who's been tinkering with IoT devices for a while, there's something here for everyone. So, grab a coffee, get comfortable, and let's make this happen!
Read also:Serenity Cox Bio The Rising Star Whorsquos Turning Heads
What is SSH and Why Does It Matter for RemoteIoT Devices?
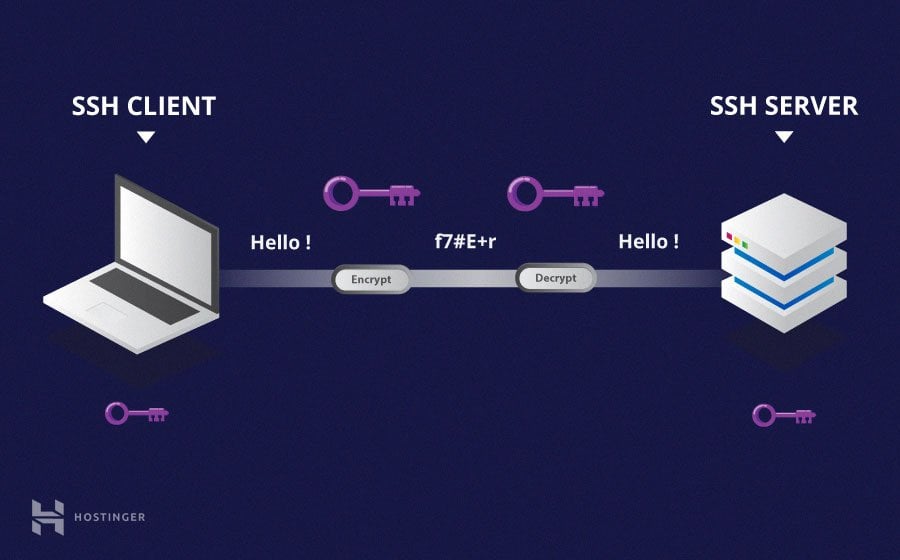
Alright, let's start with the basics. SSH (Secure Shell) is like the Swiss Army knife of remote connections. It's a protocol that allows you to securely access and manage devices over a network. But why does it matter for remoteIoT devices? Well, think about it: IoT devices are everywhere—smart thermostats, security cameras, industrial sensors, you name it. And these devices often need to be managed remotely. Without SSH, you'd be exposing yourself to all kinds of security risks.
SSH encrypts all communication between your computer and the IoT device, making it nearly impossible for hackers to intercept your data. It also provides authentication, meaning only authorized users can access the device. In today's world, where cyber threats are more common than ever, SSH is your first line of defense. Plus, it's super versatile. You can use it for file transfers, command execution, and even tunneling other protocols.
Key Features of SSH for IoT Devices
Let's take a closer look at what makes SSH so awesome for managing remoteIoT devices:
- Encryption: SSH encrypts all data transferred between your computer and the IoT device, keeping your information safe from prying eyes.
- Authentication: SSH uses public-key cryptography to ensure that only authorized users can access the device.
- Remote Command Execution: With SSH, you can run commands on your IoT device from anywhere in the world, as long as you have an internet connection.
- File Transfer: SSH includes a secure file transfer protocol (SFTP) that allows you to transfer files between your computer and the IoT device.
Setting Up SSH on Your RemoteIoT Device
Now that you understand the importance of SSH, let's get down to business. Setting up SSH on your remoteIoT device isn't as complicated as it sounds. Most modern IoT devices come with SSH pre-installed, but you might need to enable it. Here's how you can do it:
Step 1: Enable SSH on Your IoT Device
The first step is to enable SSH on your IoT device. This process varies depending on the device you're using, but here's a general guide:
- Log in to your IoT device's admin interface. This is usually done through a web browser or a terminal.
- Look for an option to enable SSH. It might be under "Settings," "Security," or "Network."
- Once you've enabled SSH, make sure to note down the device's IP address. You'll need it later to connect.
Step 2: Install an SSH Client
Next, you'll need an SSH client on your computer. If you're using a Mac or Linux machine, you're in luck—SSH is already installed. For Windows users, you'll need to download a client like PuTTY or use the built-in SSH client in Windows 10. Here's how to install it:
Read also:Discover The Address Of Walmart Corporate Headquarters A Comprehensive Guide
- Open the Command Prompt or PowerShell.
- Type "ssh" and hit Enter. If it's installed, you'll see a message saying "ssh: command not found." If not, you'll need to enable it through Windows Features.
Connecting to Your RemoteIoT Device via SSH
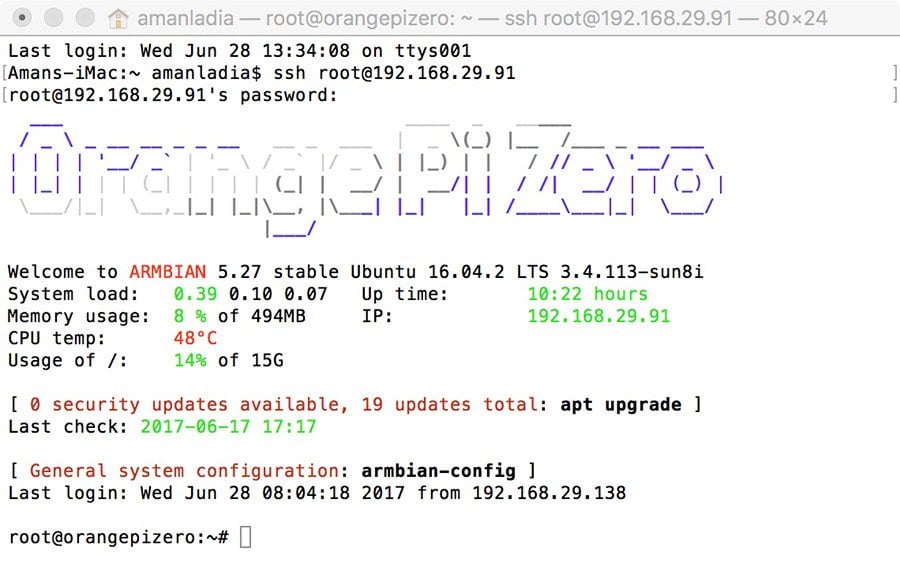
With SSH enabled on your device and a client installed on your computer, it's time to connect. This is where the magic happens. Here's how you can connect to your remoteIoT device:
Step 1: Open Your SSH Client
Depending on your operating system, open the appropriate SSH client. For Mac and Linux users, open the Terminal. For Windows users, open PuTTY or the Command Prompt.
Step 2: Enter the Connection Command
In your SSH client, type the following command:
ssh username@ip_address
Replace "username" with the username for your IoT device and "ip_address" with the device's IP address. Hit Enter, and you'll be prompted to enter a password. Once you've entered the password, you're in!
Securing Your RemoteIoT SSH Connection
Now that you're connected, it's time to make sure your connection is as secure as possible. Security isn't just a nice-to-have—it's a must-have, especially when dealing with IoT devices. Here are some tips to keep your remoteIoT device SSH connection secure:
1. Use Strong Passwords
This one's a no-brainer. Use a strong, unique password for your IoT device. Avoid using common passwords like "123456" or "password." Instead, go for something complex with a mix of letters, numbers, and symbols.
2. Enable Public-Key Authentication
Public-key authentication is like a digital handshake between your computer and the IoT device. It eliminates the need for passwords and makes your connection even more secure. Here's how to set it up:
- Generate a public and private key pair on your computer.
- Copy the public key to your IoT device.
- Configure the device to only accept connections using the public key.
3. Change the Default SSH Port
By default, SSH runs on port 22. Changing this to a non-standard port can help deter automated attacks. Just make sure to update your firewall rules accordingly.
Troubleshooting Common SSH Issues
Let's face it—things don't always go as planned. If you're having trouble connecting to your remoteIoT device via SSH, here are some common issues and how to fix them:
Issue 1: Connection Refused
If you're getting a "Connection refused" error, it could mean that SSH isn't enabled on your device. Double-check the settings and make sure SSH is turned on. Also, verify that the IP address and port number are correct.
Issue 2: Permission Denied
A "Permission denied" error usually means that your username or password is incorrect. Double-check your credentials and make sure you're using the right ones. If you're using public-key authentication, ensure that the public key is properly configured on the device.
Advanced SSH Techniques for RemoteIoT Devices
Once you've mastered the basics, it's time to take your remoteIoT device SSH skills to the next level. Here are some advanced techniques to explore:
1. SSH Tunneling
SSH tunneling allows you to forward traffic from one port on your local machine to another port on the remote device. This is especially useful for accessing services that aren't exposed to the internet.
2. Automated SSH Connections
If you find yourself frequently connecting to the same IoT device, you can set up automated connections using scripts. This saves time and reduces the risk of human error.
Best Practices for Managing RemoteIoT Devices with SSH
Managing remoteIoT devices with SSH requires a bit of discipline. Here are some best practices to keep in mind:
- Regularly update your IoT device's firmware to patch security vulnerabilities.
- Monitor your SSH connections for unauthorized access attempts.
- Use a firewall to restrict access to your IoT device.
Conclusion: Take Your RemoteIoT Device Management to the Next Level
And there you have it—a comprehensive guide to remoteIoT device SSH! Whether you're a beginner or an experienced user, mastering SSH is essential for anyone working with IoT devices. By following the steps outlined in this tutorial, you'll be able to securely manage your devices from anywhere in the world. So, what are you waiting for? Get out there and start tinkering!
Before you go, I want to leave you with a challenge. Try implementing one of the advanced techniques we discussed, like SSH tunneling or automated connections. Share your experience in the comments below—I'd love to hear how it goes. And don't forget to check out our other tutorials for more tips and tricks on IoT and beyond!
Stay safe, stay secure, and happy hacking!
Table of Contents:
- What is SSH and Why Does It Matter for RemoteIoT Devices?
- Key Features of SSH for IoT Devices
- Setting Up SSH on Your RemoteIoT Device
- Step 1: Enable SSH on Your IoT Device
- Step 2: Install an SSH Client
- Connecting to Your RemoteIoT Device via SSH
- Step 1: Open Your SSH Client
- Step 2: Enter the Connection Command
- Securing Your RemoteIoT SSH Connection
- Use Strong Passwords