Hey there, tech enthusiasts! If you're reading this, chances are you're diving into the world of remote access, IoT devices, and Mac compatibility. Using SSH remote IoT on your Mac for free is not only possible but also incredibly powerful if done right. Whether you're a hobbyist, developer, or just someone curious about expanding their tech skills, this guide will walk you through everything you need to know.
SSH (Secure Shell) is one of those tools that sounds super technical, but trust me, it's easier than it seems. It's like giving yourself a secret tunnel to remotely control and interact with your IoT devices from anywhere. In today's interconnected world, knowing how to use SSH can open up endless possibilities for managing smart gadgets, servers, and even your own home automation setup.
Now, before we dive deep into the nitty-gritty, let me clarify something: this guide is designed to be beginner-friendly yet packed with enough detail to satisfy even the most seasoned pros. By the end of this article, you'll not only understand how SSH works but also how to set it up on your Mac to communicate with IoT devices without breaking the bank. So grab your favorite drink, and let's get started!
Read also:What Is Aba For Banking A Comprehensive Guide To Understanding Aba In The Banking World
What is SSH and Why Should You Care?
Alright, let's break it down. SSH stands for Secure Shell, and it's essentially a protocol that allows you to securely connect to a remote device over a network. Think of it as a digital handshake that lets you access and control another computer or device from afar. The beauty of SSH is that it encrypts all data transferred between your Mac and the target device, making it a safe and reliable option for remote operations.
Why should you care? Well, if you're into IoT (Internet of Things), you probably have a bunch of smart devices scattered around your home or office. Instead of physically walking up to each one, SSH lets you manage them from your cozy desk. Plus, it's free! No need to shell out cash for expensive software when SSH is already built into your Mac.
Benefits of Using SSH for Remote IoT on Mac
Let's talk about why SSH is such a game-changer for Mac users looking to tinker with IoT devices:
- Security: SSH uses encryption to protect your data, which is crucial when dealing with sensitive information on IoT devices.
- Flexibility: You can connect to almost any device that supports SSH, whether it's a Raspberry Pi, a smart thermostat, or even a remote server.
- Cost-Effective: Since SSH comes pre-installed on macOS, you don't need to buy additional software or subscriptions.
- Automation: With SSH, you can write scripts to automate repetitive tasks on your IoT devices, saving you time and effort.
These benefits make SSH an invaluable tool for anyone serious about IoT development or remote management. But how exactly do you get started? Let's find out!
Setting Up SSH on Your Mac
Here's the good news: macOS already has SSH built-in. All you need to do is enable it and configure your settings. Follow these simple steps:
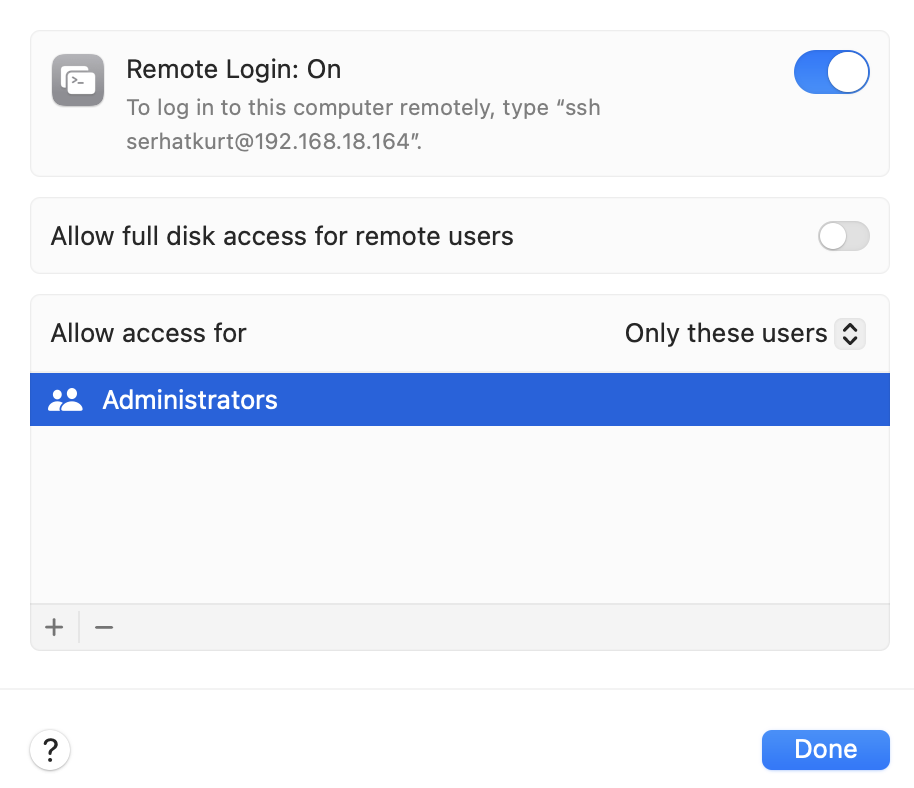
Step 1: Enable SSH on Your Mac
First things first, you'll want to make sure SSH is turned on:
Read also:Brownsville Tx Climate Your Ultimate Guide To Weather Seasons And Living Conditions
- Go to System Preferences on your Mac.
- Click on Sharing.
- In the left-hand menu, check the box next to Remote Login.
- You'll see a message saying "To log in to this computer remotely, type..." Take note of the address provided; you'll need it later.
Boom! SSH is now enabled on your Mac. Easy peasy, right?
Step 2: Install an SSH Client (If Needed)
While macOS comes with a built-in Terminal app that supports SSH, some users prefer using third-party clients for added features. If you want to explore alternatives, consider tools like:
- Terminal: The default app on macOS. Simple and effective.
- Termius: A user-friendly SSH client with a sleek interface.
- PuTTY (for Windows users): Though you're on a Mac, it's worth mentioning for cross-platform compatibility.
For this guide, we'll stick with Terminal since it's already there and ready to go.
Connecting to an IoT Device via SSH
Now that your Mac is set up, it's time to connect to an IoT device. Here's how:
Step 1: Gather Your Device Info
Before you start, make sure you have the following details about your IoT device:
- IP Address: This is the unique address assigned to your device on the network.
- Username: The login name for the device.
- Password: The corresponding password for the username.
If you're working with a Raspberry Pi, for example, the default username is usually "pi," and the password is "raspberry." You can always change these later for added security.
Step 2: Open Terminal and Enter the Command
Once you have all the necessary info, open Terminal on your Mac and type the following command:
ssh username@ip_address
Replace "username" with the actual username of your device and "ip_address" with its IP address. Hit Enter, and you'll be prompted to enter the password. Voilà! You're now connected to your IoT device via SSH.
Troubleshooting Common SSH Issues
Let's face it—things don't always go smoothly the first time around. Here are some common issues you might encounter and how to fix them:
- Connection Refused: Double-check the IP address and ensure that SSH is enabled on the target device.
- Authentication Failed: Verify that you're using the correct username and password.
- Network Problems: Ensure both your Mac and the IoT device are connected to the same network.
Still stuck? Feel free to drop a comment below, and I'll do my best to help you out!
Best Practices for Using SSH Securely
Security should always be a top priority when working with SSH. Here are some tips to keep your connections safe:
- Use Strong Passwords: Avoid common or easily guessable passwords.
- Enable Key-Based Authentication: This method uses cryptographic keys instead of passwords, adding an extra layer of protection.
- Update Regularly: Keep your operating systems and devices up to date to patch any security vulnerabilities.
By following these best practices, you can enjoy the convenience of SSH without compromising your security.
Advanced SSH Techniques for IoT Enthusiasts
Ready to take your SSH skills to the next level? Here are a few advanced techniques to explore:
Port Forwarding
Port forwarding allows you to redirect traffic from one port to another. This can be useful if you're running a web server on your IoT device and want to access it from outside your local network.
SSH Tunnels
SSH tunnels create a secure channel for transmitting data between your Mac and an IoT device. This is particularly handy when dealing with sensitive information.
Real-World Applications of SSH in IoT
Now that you know how to use SSH, let's talk about some practical applications:
- Home Automation: Control smart lights, thermostats, and security systems remotely.
- Remote Monitoring: Keep tabs on environmental sensors or weather stations from anywhere.
- Server Management: Manage and maintain servers without being physically present.
These examples barely scratch the surface of what's possible with SSH and IoT. The only limit is your imagination!
Conclusion and Next Steps
And there you have it—a comprehensive guide on how to use SSH remote IoT on Mac for free. From setting up SSH to troubleshooting common issues and exploring advanced techniques, you now have the knowledge and tools to take your IoT projects to the next level.
So what's next? Start experimenting with SSH on your own devices. The more you practice, the more comfortable you'll become. And remember, the tech community is always here to support you. If you have any questions or need further assistance, don't hesitate to leave a comment or reach out. Happy tinkering, and see you in the next article!
Table of Contents
- What is SSH and Why Should You Care?
- Benefits of Using SSH for Remote IoT on Mac
- Setting Up SSH on Your Mac
- Connecting to an IoT Device via SSH
- Troubleshooting Common SSH Issues
- Best Practices for Using SSH Securely
- Advanced SSH Techniques for IoT Enthusiasts
- Real-World Applications of SSH in IoT
- Conclusion and Next Steps