Alright folks, let’s get real here—working remotely has become the norm these days, and having a reliable setup is crucial. If you're looking to set up a remoteiot web ssh server windows 10, you're in the right place. Whether you're a tech enthusiast or someone who just wants to access their files securely from anywhere, this guide will walk you through the process step by step. So grab your favorite drink, and let's dive in!
Setting up an SSH server might sound intimidating at first, but trust me, it’s easier than you think. By the end of this article, you’ll have a fully functional SSH server running on your Windows 10 machine. This setup will allow you to connect to your computer remotely, manage files, and even run commands as if you were sitting right in front of it.
Before we proceed, let’s quickly break down what we’re talking about here. SSH, or Secure Shell, is a protocol that lets you securely connect to another computer over the internet. With remoteiot web ssh server windows 10, you can turn your PC into a remote server, giving you access to all your files and applications no matter where you are. Now, isn’t that cool?
Read also:Forever21 Returns Policy The Ultimate Guide To Make Your Fashion Comeback
Why Set Up a RemoteIoT SSH Server on Windows 10?
Let’s face it—life gets busy, and sometimes you need access to your files when you’re miles away from your computer. That’s where setting up an SSH server comes in handy. Here are some reasons why you should consider doing this:
- Secure File Access: SSH encrypts all data transmitted between your local machine and the remote server, ensuring that your files are safe from prying eyes.
- Remote Command Execution: You can run commands on your Windows 10 machine from anywhere, which is super useful for troubleshooting or managing your system.
- Cost-Effective: Instead of paying for cloud storage services, you can use your own PC as a server, saving you money in the long run.
- Learning Opportunity: Setting up an SSH server is a great way to improve your tech skills and understand how networking works.
So, if you’re ready to take control of your digital life, let’s move on to the next section.
What You’ll Need Before You Start
Before we dive into the setup process, make sure you have the following:
- A Windows 10 machine with administrative privileges.
- An active internet connection (preferably a stable one).
- A basic understanding of networking concepts (don’t worry, we’ll explain everything as we go).
- An SSH client (we’ll cover this later).
Once you’ve got everything ready, let’s move on to the next step.
Step 1: Enable the OpenSSH Server on Windows 10
The first thing you need to do is enable the OpenSSH server feature on your Windows 10 machine. Here’s how:
Head over to Settings > Apps > Optional Features. Click on Add a Feature, and scroll down until you find OpenSSH Server. Install it, and you’re good to go. Easy peasy, right?
Read also:Shawn Ryan Military Career A Comprehensive Look Into His Journey And Achievements
Troubleshooting Tips
If you run into any issues during this step, here are a few things you can try:
- Make sure your Windows 10 version supports OpenSSH (most modern versions do).
- Restart your computer after enabling the feature.
- Check for any firewall rules that might be blocking the SSH service.
Now that we’ve got the server up and running, let’s move on to configuring it.
Step 2: Configuring the SSH Server
Once the OpenSSH server is installed, you’ll need to configure it to work the way you want. Here’s what you need to do:
Open up the Command Prompt as an administrator and type in the following command:
services.msc
From there, locate the OpenSSH SSH Server service, right-click on it, and select Properties. Set the startup type to Automatic and start the service if it’s not already running.
Setting Up SSH Keys
Using SSH keys is a more secure way to authenticate yourself when connecting to your server. Here’s how you can set them up:
Generate a key pair using the ssh-keygen command, and then copy the public key to your server. This will allow you to connect without entering a password every time.
Step 3: Port Forwarding and Firewall Settings
Now that your SSH server is up and running, you’ll need to make sure it’s accessible from outside your local network. This involves setting up port forwarding on your router and configuring your firewall settings.
Port Forwarding
Log in to your router’s admin interface and find the port forwarding section. Add a new rule that forwards traffic on port 22 (the default SSH port) to your Windows 10 machine’s IP address.
Firewall Configuration
Next, you’ll need to allow incoming connections on port 22 through your Windows firewall. To do this, go to Control Panel > System and Security > Windows Defender Firewall, and click on Allow an app or feature through Windows Defender Firewall. Add a new rule to allow incoming traffic on port 22.
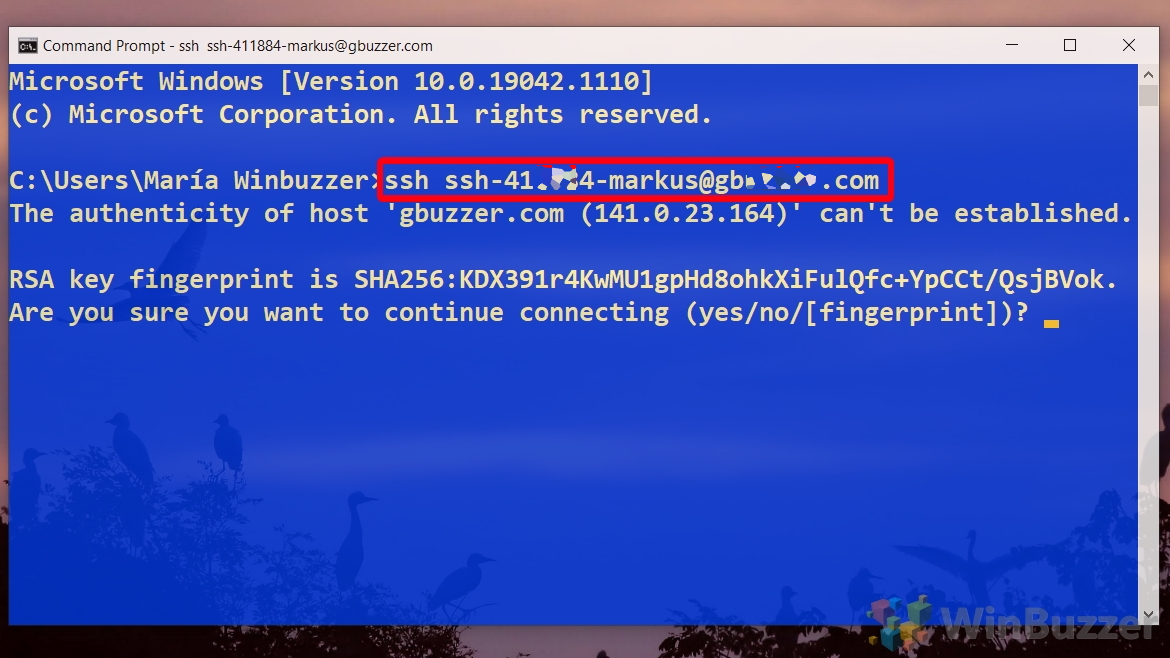
Step 4: Testing Your Setup
Now that everything is configured, it’s time to test your setup. Use an SSH client like PuTTY or the built-in SSH client in Windows to connect to your server from another device. If everything is set up correctly, you should be able to log in without any issues.
Common Issues and Solutions
Here are a few common issues you might encounter and how to fix them:
- Connection Refused: Double-check your port forwarding and firewall settings.
- Authentication Failed: Make sure you’re using the correct username and password, or check your SSH keys.
- Timeout Errors: Ensure that your router and firewall are not blocking the connection.
Step 5: Securing Your SSH Server
Security is key when setting up an SSH server. Here are a few tips to keep your server safe:
- Change the Default Port: Instead of using port 22, consider changing it to something less common to deter attackers.
- Disable Password Authentication: Use SSH keys instead of passwords for added security.
- Limit Access: Restrict access to specific IP addresses or networks if possible.
Advanced Security Measures
If you’re feeling adventurous, you can take your security to the next level by:
- Setting up fail2ban to block repeated login attempts.
- Using a hardware security module (HSM) for key storage.
- Regularly updating your server software to patch vulnerabilities.
Step 6: Automating Your SSH Connections
Once your SSH server is up and running, you might want to automate some of your connections. This can save you time and effort in the long run. Here’s how:
Create a batch file or script that automatically connects to your server using the ssh command. You can also set up a cron job or task scheduler to run commands at specific intervals.
Using SSH Tunnels
SSH tunnels are a great way to securely access services running on your server. For example, you can use an SSH tunnel to access a web server running on your machine from anywhere in the world.
Conclusion
And there you have it—your very own remoteiot web ssh server windows 10! By following this guide, you’ve learned how to set up, configure, and secure an SSH server on your Windows 10 machine. Whether you’re accessing files remotely, running commands, or automating tasks, SSH is a powerful tool that can help you take control of your digital life.
So, what are you waiting for? Go ahead and try it out! And if you found this article helpful, don’t forget to share it with your friends and leave a comment below. Let’s keep the conversation going!
Table of Contents
- Why Set Up a RemoteIoT SSH Server on Windows 10?
- What You’ll Need Before You Start
- Step 1: Enable the OpenSSH Server on Windows 10
- Step 2: Configuring the SSH Server
- Step 3: Port Forwarding and Firewall Settings
- Step 4: Testing Your Setup
- Step 5: Securing Your SSH Server
- Step 6: Automating Your SSH Connections
- Conclusion
Remember, the world of technology is constantly evolving, and staying ahead of the curve is essential. With your new SSH server, you’re well on your way to becoming a tech wizard. Happy networking, folks!