Imagine this: you’re sitting comfortably at home, sipping your favorite coffee, while your IoT devices scattered across the globe are seamlessly connected to your Raspberry Pi through AWS. Sounds like a dream, right? Well, it’s not just a dream anymore. With the power of AWS Free Tier, you can securely connect remote IoT devices to your VPC (Virtual Private Cloud) using Raspberry Pi, all without breaking the bank. In this article, we’ll dive deep into how you can achieve this setup effortlessly.
Whether you’re a tech enthusiast, a hobbyist, or a professional looking to expand your IoT network, understanding how to securely connect remote IoT devices is crucial. In today’s connected world, security should never be compromised, especially when dealing with sensitive data. This guide will walk you step-by-step through the process, ensuring your devices are not only connected but also protected.
So, grab your Raspberry Pi, fire up your AWS account, and let’s get started. By the end of this article, you’ll have a robust, secure IoT setup that leverages the power of AWS for free. Let’s make it happen!
Read also:What Is Tis Real Name A Deep Dive Into The Life And Legacy Of A Hiphop Icon
Table of Contents
- What is IoT and Why It Matters?
- Raspberry Pi Basics for IoT
- Understanding AWS VPC for IoT
- How to Securely Connect Remote IoT Devices
- Leveraging AWS Free Tier for IoT
- Step-by-Step Guide to Setup
- Best Practices for IoT Security
- Common Issues and Troubleshooting
- Frequently Asked Questions
- Conclusion: Take Your IoT Game to the Next Level
What is IoT and Why It Matters?
IoT, or the Internet of Things, is basically the concept of connecting everyday devices to the internet and each other. Think smart thermostats, security cameras, and even your fridge. These devices collect data, communicate with each other, and help make our lives easier. But why does it matter? Well, with IoT, you can automate tasks, monitor conditions remotely, and gain insights that were previously impossible.
And let’s be honest, IoT is everywhere now. From smart homes to industrial applications, IoT is revolutionizing the way we live and work. But with great power comes great responsibility, and that’s where security comes in. You don’t want your smart fridge spilling your grocery secrets, do you?
Key Benefits of IoT
- Automation: Automate repetitive tasks and save time.
- Remote Monitoring: Keep an eye on your devices no matter where you are.
- Data Insights: Gather valuable data to make informed decisions.
Raspberry Pi Basics for IoT
Raspberry Pi is like the Swiss Army knife of the tech world. It’s a tiny, affordable computer that can do some pretty amazing things. For IoT enthusiasts, Raspberry Pi is a game-changer. You can use it as a hub for your IoT devices, a server, or even a media center.
But before you dive in, here are a few things you need to know:
What You’ll Need
- Raspberry Pi (any model will do, but Pi 4 is recommended).
- MicroSD card with Raspberry Pi OS installed.
- Power supply.
- Internet connection.
Once you’ve got all the hardware sorted, it’s time to set up your Raspberry Pi. Don’t worry, it’s not as daunting as it sounds. There are plenty of tutorials out there to help you get started.
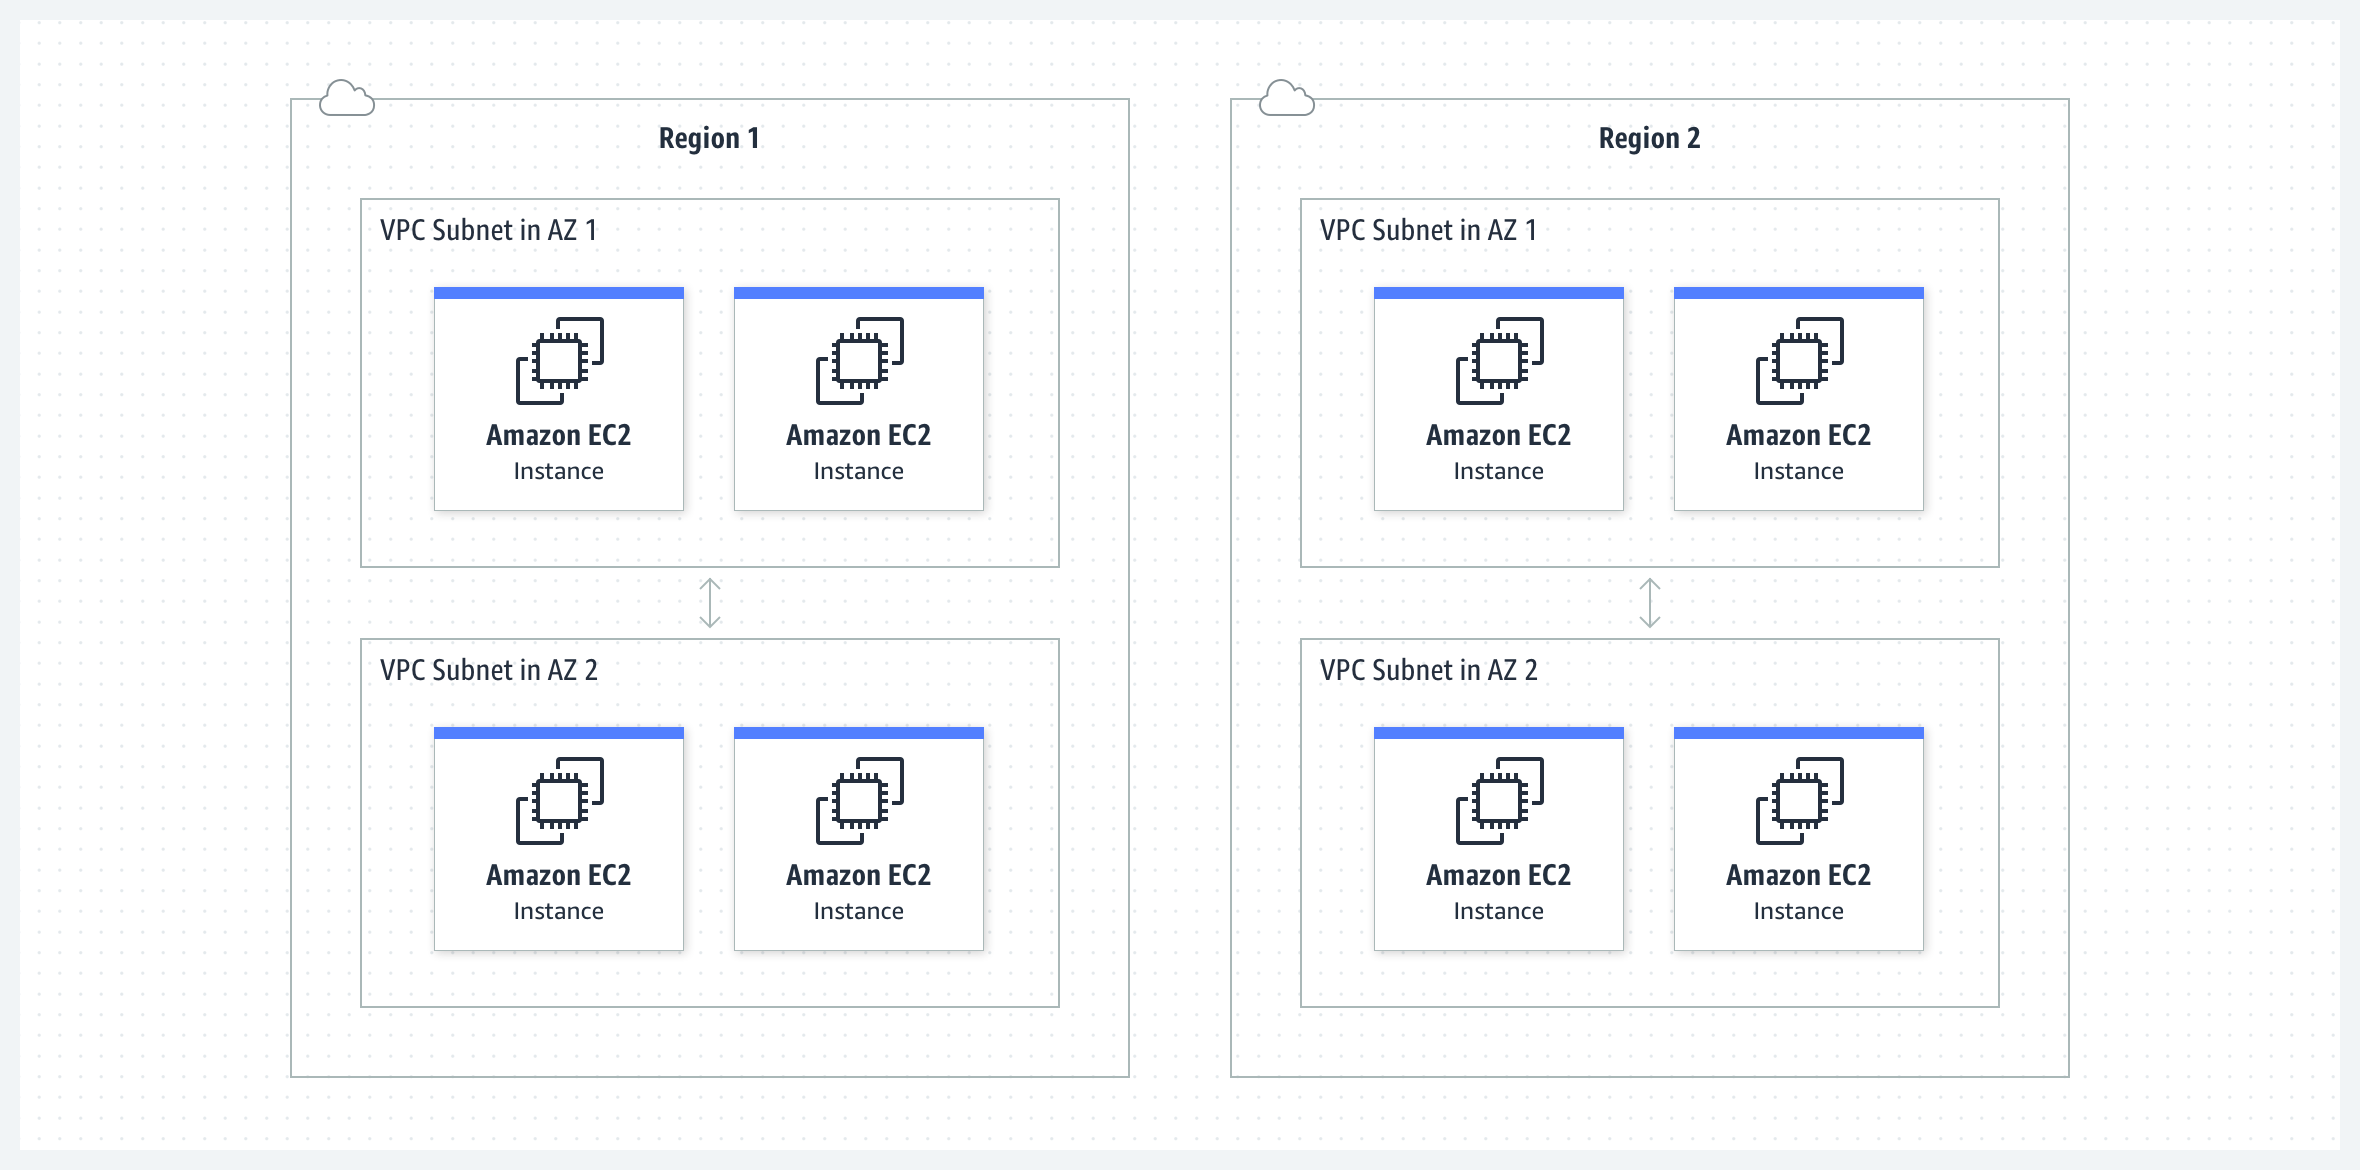
Understanding AWS VPC for IoT
AWS VPC (Virtual Private Cloud) is like a private network in the cloud. It’s where you can host your IoT devices and keep them secure. Think of it as a virtual fortress that protects your data from prying eyes. With AWS VPC, you can control who has access to your network and how they access it.
Read also:Cinemark On Carefree Your Ultimate Movie Experience Just Got Better
But why use AWS VPC for IoT? Well, AWS offers a range of services that make it easy to manage your IoT devices. From device management to data storage, AWS has got you covered. Plus, with AWS Free Tier, you can try out these services without spending a dime.
Key Features of AWS VPC
- Private Subnets: Keep your devices isolated from the public internet.
- Security Groups: Control access to your devices with fine-grained rules.
- Route Tables: Define how traffic flows within your VPC.
How to Securely Connect Remote IoT Devices
Now, let’s get to the meat of the matter: how do you securely connect remote IoT devices to your Raspberry Pi through AWS VPC? The process might sound complicated, but with the right steps, it’s totally doable.
First things first, you’ll need to set up your Raspberry Pi as a server. This involves installing the necessary software and configuring it to communicate with AWS. Once that’s done, you can set up your VPC in AWS and connect your Raspberry Pi to it.
Steps to Secure Connection
- Install and configure your Raspberry Pi.
- Create a VPC in AWS and set up subnets and security groups.
- Connect your Raspberry Pi to the VPC.
- Secure your connection with SSL/TLS encryption.
And there you have it! Your IoT devices are now securely connected to your Raspberry Pi through AWS VPC. But remember, security is an ongoing process. You’ll need to keep an eye on your devices and update your security measures regularly.
Leveraging AWS Free Tier for IoT
One of the coolest things about AWS is the Free Tier. For the first 12 months, you can use a range of AWS services for free. This includes EC2 instances, S3 storage, and even IoT Core. So, if you’re just starting out with IoT, AWS Free Tier is a great way to get your feet wet without spending a cent.
But here’s the catch: the Free Tier has limits. You can only use a certain amount of resources each month, so you’ll need to plan accordingly. Still, for most hobbyists and small-scale projects, the Free Tier is more than enough.
Benefits of AWS Free Tier
- Cost-Effective: Try out AWS services without any upfront costs.
- Scalable: Easily scale up your resources as your project grows.
- Support: Access to AWS documentation and community forums.
Step-by-Step Guide to Setup
Now that you know the basics, let’s dive into the step-by-step guide to setting up your secure IoT connection. This section will walk you through each step, from setting up your Raspberry Pi to connecting it to AWS VPC.
Step 1: Set Up Your Raspberry Pi
Start by installing Raspberry Pi OS on your MicroSD card. Once that’s done, boot up your Raspberry Pi and connect it to your local network. Make sure you’ve updated all the software and installed any necessary drivers.
Step 2: Create a VPC in AWS
Head over to the AWS Management Console and create a new VPC. Set up your subnets, security groups, and route tables. Make sure your VPC is configured to allow traffic from your Raspberry Pi.
Step 3: Connect Raspberry Pi to VPC
Use SSH to connect your Raspberry Pi to your AWS VPC. Configure your network settings and test the connection. You should now be able to access your Raspberry Pi from within your VPC.
Step 4: Secure Your Connection
Finally, secure your connection with SSL/TLS encryption. This will ensure that all communication between your devices is encrypted and protected from unauthorized access.
Best Practices for IoT Security
Security should always be a top priority when dealing with IoT devices. Here are a few best practices to keep your setup safe:
- Use strong passwords and change them regularly.
- Keep your software and firmware up to date.
- Monitor your devices for suspicious activity.
- Limit access to your network to only those who need it.
By following these best practices, you can significantly reduce the risk of security breaches and keep your data safe.
Common Issues and Troubleshooting
Even with the best-laid plans, things can go wrong. Here are a few common issues you might encounter and how to troubleshoot them:
- Connection Issues: Check your network settings and ensure your Raspberry Pi is connected to the correct network.
- Security Group Rules: Make sure your security group rules allow traffic from your Raspberry Pi.
- SSL/TLS Configuration: Double-check your SSL/TLS settings and ensure they’re correctly configured.
If you’re still having trouble, don’t hesitate to reach out to the AWS community forums or consult the official AWS documentation.
Frequently Asked Questions
Got questions? We’ve got answers. Here are a few frequently asked questions about securely connecting remote IoT devices to Raspberry Pi through AWS VPC:
- Can I use any Raspberry Pi model? Yes, but Pi 4 is recommended for better performance.
- How much does it cost? With AWS Free Tier, it’s free for the first 12 months.
- Is it secure? Absolutely, as long as you follow the best practices outlined in this guide.
Conclusion: Take Your IoT Game to the Next Level
And there you have it! You now know how to securely connect remote IoT devices to your Raspberry Pi through AWS VPC. With the power of AWS Free Tier, you can achieve this without spending a dime. So, what are you waiting for? Get out there and start building your IoT empire.
Remember, security is key. Always follow best practices and keep an eye on your devices. And don’t forget to share your experiences and insights with the community. Who knows, you might inspire someone else to take their IoT game to the next level.
So, tell us in the comments below: what’s your favorite IoT project? And if you found this article helpful, be sure to share it with your friends and followers. Let’s keep the IoT revolution going!