So, you want to dive into the world of SSH Remote IoT on your Mac without spending a dime? Well, buckle up because we’re about to take you on a journey that’ll make you a pro in no time. Whether you’re a tech enthusiast, a student, or just someone curious about remote connections, this guide has got your back. SSH Remote IoT on Mac is not as complicated as it sounds, and we’re here to break it down step by step for you.
Let’s face it, IoT (Internet of Things) is everywhere these days. From smart homes to industrial automation, IoT devices are revolutionizing the way we interact with technology. But what happens when you need to manage or control these devices remotely? That’s where SSH (Secure Shell) comes in. It’s like having a secret tunnel that lets you access your IoT devices from anywhere, and the best part? You can do it all for free on your Mac.
In this guide, we’ll walk you through everything you need to know about setting up SSH Remote IoT on your Mac. From the basics to advanced tips, we’ve got you covered. So grab a cup of coffee, sit back, and let’s get started. Trust me, by the end of this, you’ll be wondering why you didn’t try this sooner.
Read also:Atampt Help Your Ultimate Guide To Solving Connectivity Issues And Boosting Your Experience
What is SSH and Why Should You Care?
Alright, let’s start with the basics. SSH stands for Secure Shell, and it’s basically a protocol that allows you to securely connect to another computer or device over a network. Think of it as a super secure way to communicate with your IoT devices, even when you’re miles away. It’s not just about remote access; SSH also encrypts all your data, making it nearly impossible for hackers to intercept.
Now, why should you care? Well, if you’re working with IoT devices, chances are you’ll need to manage them remotely at some point. Whether it’s troubleshooting a device, updating firmware, or just checking on its status, SSH makes all of this possible without compromising security. Plus, it’s free! Who doesn’t love free stuff, right?
SSH in the World of IoT
When it comes to IoT, SSH is like the unsung hero. It provides a secure and reliable way to interact with your devices, no matter where they are. Whether you’re managing a fleet of smart sensors or controlling a remote weather station, SSH ensures that your data is safe and your connection is stable. And the best part? You can do all of this from the comfort of your Mac.
So, if you’re thinking about diving into the world of IoT, mastering SSH should be at the top of your list. Trust me, once you get the hang of it, you’ll wonder how you ever lived without it.
Why Use SSH for Remote IoT on Mac?
Now that we’ve covered the basics, let’s talk about why SSH is such a great choice for remote IoT on your Mac. First of all, it’s built right into macOS, so you don’t need to download any additional software. That’s right, no pesky installs or complicated setups. Just fire up your terminal and you’re good to go.
But that’s not all. SSH is also incredibly versatile. You can use it to transfer files, run commands, and even set up secure tunnels for other applications. And because it’s open-source, there’s a huge community of developers out there who are constantly improving and expanding its capabilities.
Read also:Unlocking The Power Of Usps Order Your Ultimate Guide To Seamless Shipping
- Secure and encrypted connections
- Built-in support on macOS
- Highly versatile and customizable
- Free to use with no hidden costs
SSH vs Other Remote Access Tools
Of course, there are other tools out there for remote access, but SSH stands out for a few key reasons. First, it’s incredibly secure. Unlike some other tools that rely on less secure protocols, SSH uses strong encryption to protect your data. Second, it’s lightweight and efficient, which means it won’t slow down your Mac or your IoT devices.
And let’s not forget about flexibility. With SSH, you can do so much more than just remote access. You can automate tasks, set up secure tunnels, and even use it as a development environment. It’s like having a Swiss Army knife for your IoT devices.
Setting Up SSH on Your Mac
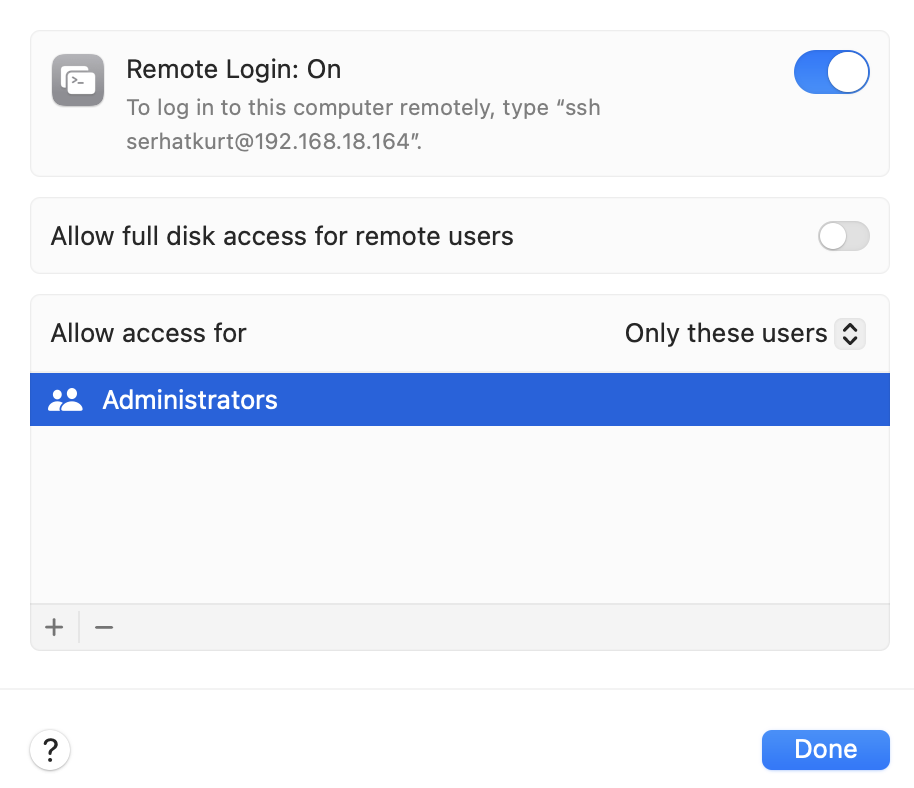
Ready to get started? Good, because setting up SSH on your Mac is easier than you think. All you need is a terminal window and a few simple commands. Don’t worry if you’re not a terminal wizard; we’ll walk you through every step.
First, open up your terminal. You can find it in Applications > Utilities > Terminal. Once you’re there, type in the following command to enable SSH on your Mac:
sudo systemsetup -setremotelogin on
That’s it! You’ve just enabled SSH on your Mac. Now you’re ready to start connecting to your IoT devices.
Generating SSH Keys for Extra Security
While SSH is already pretty secure, you can take it up a notch by generating SSH keys. This adds an extra layer of protection by requiring a private key to access your devices. Here’s how you do it:
- Open your terminal
- Type in
ssh-keygen -t rsa -b 4096 - Follow the prompts to create your key
Once you’ve generated your keys, you can copy the public key to your IoT devices using the following command:
ssh-copy-id user@remote_host
And just like that, you’ve got an extra layer of security for your remote connections.
Connecting to Your IoT Devices
Now that you’ve got SSH set up on your Mac, it’s time to connect to your IoT devices. This part is where the magic happens, and trust me, it’s easier than it sounds. All you need is the IP address of your device and a few simple commands.
Open up your terminal and type in the following command:
ssh user@remote_host
Replace user with your username and remote_host with the IP address of your IoT device. Hit enter, and you’re connected! It’s that simple.
Troubleshooting Common Issues
Of course, like with any technology, things don’t always go smoothly. If you’re having trouble connecting to your IoT devices, here are a few things to check:
- Make sure SSH is enabled on both your Mac and your IoT device
- Double-check the IP address and username
- Ensure there are no firewalls blocking the connection
- Verify that your keys are correctly configured
Most issues can be resolved by going through these steps, but if you’re still stuck, don’t hesitate to reach out to the community. There’s always someone out there who’s been in your shoes and can lend a helping hand.
Advanced SSH Techniques for IoT
Once you’ve got the basics down, it’s time to take your SSH skills to the next level. There are so many advanced techniques you can use to make your life easier and your connections more efficient. Here are a few of my favorites:
SSH Tunnels for Secure Connections
SSH tunnels are a great way to securely connect to other applications or services running on your IoT devices. For example, if you’re running a web server on your device, you can set up a tunnel to access it securely from your Mac.
Here’s how you do it:
ssh -L local_port:remote_host:remote_port user@remote_host
Replace local_port, remote_host, and remote_port with the appropriate values for your setup. Now you can access your web server securely from your Mac.
Automating Tasks with SSH
Another great feature of SSH is the ability to automate tasks. Whether it’s running scripts, updating firmware, or collecting data, SSH can help you do it all without lifting a finger. Just create a script with the commands you want to run and use SSH to execute it remotely.
ssh user@remote_host 'command'
It’s like having a personal assistant for your IoT devices.
Best Practices for Secure SSH Connections
While SSH is incredibly secure, there are still a few best practices you should follow to ensure your connections are as safe as possible. Here are a few tips:
- Always use SSH keys instead of passwords
- Disable root login to prevent unauthorized access
- Use a strong and unique passphrase for your keys
- Keep your SSH software up to date
By following these simple guidelines, you can make sure your SSH connections are as secure as possible. And remember, security is a marathon, not a sprint. Stay vigilant and keep learning.
Conclusion: Take Control of Your IoT Devices Today
So there you have it, everything you need to know about using SSH Remote IoT on your Mac for free. From setting up SSH to advanced techniques, we’ve covered it all. Now it’s your turn to take what you’ve learned and put it into practice.
Remember, the world of IoT is full of possibilities, and SSH is the key to unlocking them all. So don’t wait any longer; take control of your IoT devices today and see what you can create. And don’t forget to leave a comment or share this article if you found it helpful. Until next time, happy coding!
Table of Contents
- Mastering SSH Remote IoT on Mac for Free: The Ultimate Guide
- What is SSH and Why Should You Care?
- SSH in the World of IoT
- Why Use SSH for Remote IoT on Mac?
- SSH vs Other Remote Access Tools
- Setting Up SSH on Your Mac
- Generating SSH Keys for Extra Security
- Connecting to Your IoT Devices
- Troubleshooting Common Issues
- Advanced SSH Techniques for IoT
- SSH Tunnels for Secure Connections
- Automating Tasks with SSH
- Best Practices for Secure SSH Connections
- Conclusion: Take Control of Your IoT Devices Today