Let’s face it, folks—remote IoT devices are taking over the tech world, and learning how to manage them through SSH is no longer optional but essential. If you’re scratching your head wondering what SSH even stands for or how it connects to your IoT setup, don’t sweat it. You’re not alone, and we’re here to break it down for you in plain English. SSH, or Secure Shell, is like a digital Swiss Army knife that lets you securely control your remote IoT devices from anywhere on the planet. Whether you’re a tech newbie or a seasoned pro, this guide will equip you with the tools you need to dominate the art of remote IoT device management.
In today’s hyper-connected world, IoT devices are everywhere—from smart thermostats to industrial sensors. Managing them remotely is no longer a luxury but a necessity. SSH plays a critical role in ensuring that your devices remain secure and accessible, no matter where they are located. Think of SSH as the invisible guardian of your IoT empire, keeping prying eyes away while giving you full control.
This tutorial isn’t just about theory—it’s about action. We’ll dive into practical steps, real-world examples, and pro tips to help you harness the power of SSH for your IoT devices. So, grab a cup of coffee, sit back, and let’s unravel the mysteries of remote IoT device management together. Trust me, by the end of this guide, you’ll be handling SSH like a pro!
Read also:Unveiling The Secretary Of State Powers Your Ultimate Guide
Understanding RemoteIoT Device SSH Basics
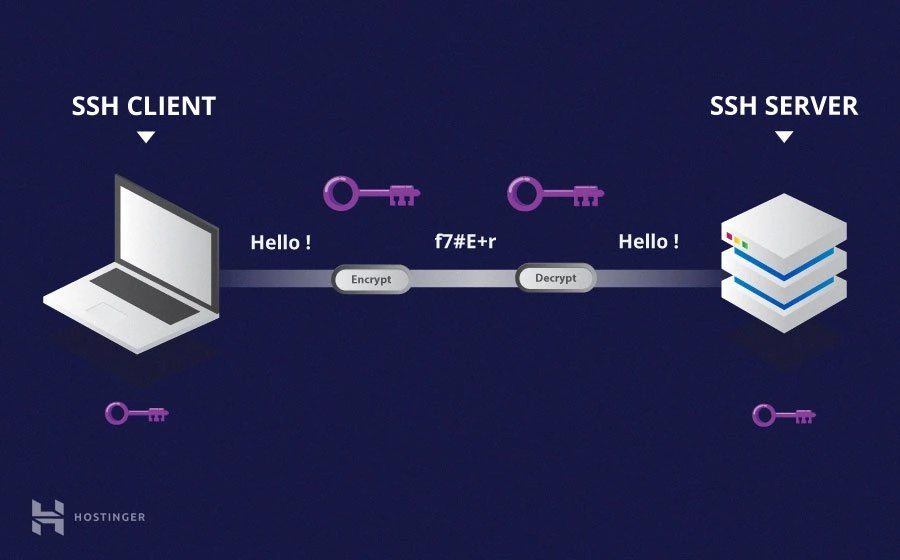
Before we dive headfirst into the nitty-gritty of SSH, let’s take a moment to understand what makes it so special. SSH, or Secure Shell, is a protocol designed to provide secure communication between your computer and a remote device over an unsecured network. In the context of IoT devices, SSH acts as a secure tunnel, allowing you to send commands, transfer files, and manage settings without exposing sensitive information.
Here’s why SSH is the go-to solution for remote IoT device management:
- Security: SSH encrypts all data transmitted between your computer and the remote device, making it nearly impossible for hackers to intercept your commands or steal sensitive information.
- Flexibility: With SSH, you can perform a wide range of tasks, from running shell commands to transferring files, all from the comfort of your desk.
- Platform Independence: Whether you’re working on Windows, macOS, or Linux, SSH works seamlessly across all major operating systems.
Now that we’ve established why SSH is the bees’ knees, let’s explore how it fits into the world of IoT. Imagine having dozens of IoT devices scattered across different locations. Without SSH, managing them would be a logistical nightmare. But with SSH, you can connect to any device, troubleshoot issues, and update settings in a matter of seconds—all from a single terminal window.
Setting Up SSH on Your RemoteIoT Device
Step 1: Preparing Your Environment
Before you can start using SSH, you’ll need to ensure that your environment is properly set up. Here’s a quick checklist to get you started:
- Device Compatibility: Make sure your IoT device supports SSH. Most modern IoT devices come with SSH pre-installed, but it’s always a good idea to double-check the manufacturer’s documentation.
- Network Configuration: Ensure that your device is connected to the same network as your computer. If your device is behind a firewall, you may need to configure port forwarding to allow SSH connections.
- SSH Client: Install an SSH client on your computer. On Linux and macOS, SSH is built into the terminal. Windows users can use tools like PuTTY or the Windows Subsystem for Linux (WSL).
Once you’ve ticked all the boxes on this checklist, you’re ready to move on to the next step.
Step 2: Generating SSH Keys
One of the coolest features of SSH is its ability to use public-key authentication, which eliminates the need to enter passwords every time you connect to a device. Here’s how you can generate SSH keys:
Read also:Hillary Farr The Renovation Queen You Need To Know
On Linux or macOS, open your terminal and type the following command:
ssh-keygen -t rsa -b 4096
This will generate a pair of keys: a public key and a private key. The public key will be placed on your IoT device, while the private key will remain securely stored on your computer.
Once the keys are generated, you’ll need to copy the public key to your IoT device. You can do this using the following command:
ssh-copy-id user@remote_device_ip
Replace "user" with your username and "remote_device_ip" with the IP address of your IoT device. If everything goes smoothly, you should now be able to connect to your device without entering a password.
Connecting to Your RemoteIoT Device via SSH
Now that your environment is set up and your SSH keys are in place, it’s time to connect to your IoT device. Here’s how you can do it:
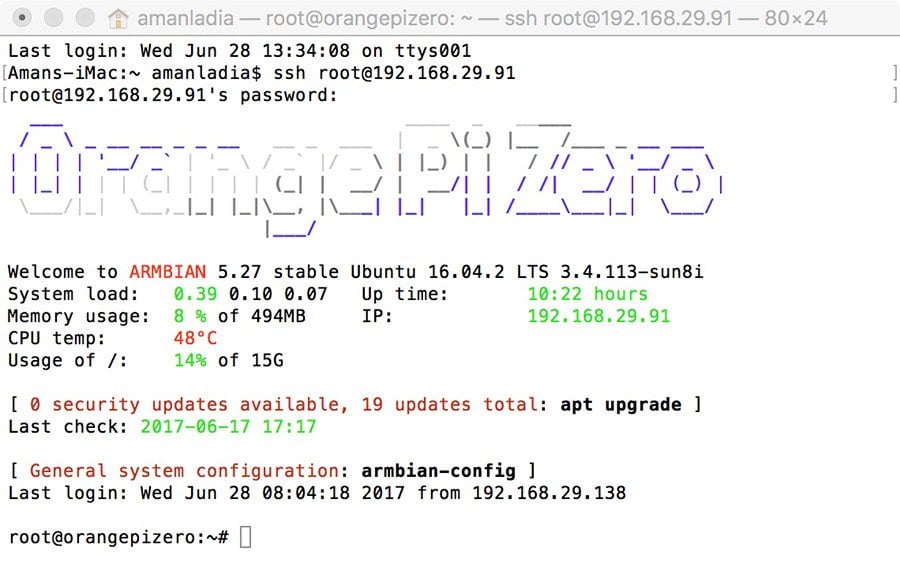
Open your terminal or SSH client and type the following command:
ssh user@remote_device_ip
Again, replace "user" with your username and "remote_device_ip" with the IP address of your IoT device. If you’ve set up public-key authentication correctly, you should be logged in instantly without needing to enter a password.
Once you’re connected, you’ll have full access to your device’s command line interface. From here, you can run commands, check device status, update settings, and even transfer files.
Common SSH Commands for RemoteIoT Devices
Now that you’re connected to your IoT device, let’s explore some of the most useful SSH commands:
- ls: Lists all files and directories in the current directory.
- cd: Changes the current directory. For example, "cd /home/user" will take you to the "user" directory.
- sudo: Grants administrative privileges, allowing you to perform tasks that require elevated permissions.
- scp: Securely copies files between your local machine and the remote device. For example, "scp file.txt user@remote_device_ip:/path/to/destination" will copy "file.txt" to the specified directory on your IoT device.
These commands are just the tip of the iceberg. As you become more comfortable with SSH, you’ll discover even more powerful tools and techniques to manage your IoT devices.
Best Practices for Secure SSH Connections
1. Use Strong Passwords
Even if you’re using public-key authentication, it’s still a good idea to set a strong password for your IoT device. Avoid using common words or easily guessable combinations. Instead, opt for a mix of uppercase and lowercase letters, numbers, and special characters.
2. Disable Password Authentication
Once you’ve set up public-key authentication, consider disabling password authentication altogether. This will prevent brute-force attacks and make your device much more secure.
To disable password authentication, edit the SSH configuration file on your IoT device:
sudo nano /etc/ssh/sshd_config
Look for the line that says "PasswordAuthentication yes" and change it to "PasswordAuthentication no". Save the file and restart the SSH service:
sudo systemctl restart ssh
3. Update Regularly
Keeping your IoT device’s software up to date is crucial for maintaining security. Regular updates not only fix bugs but also patch vulnerabilities that could be exploited by hackers.
Troubleshooting Common SSH Issues
Even the best-laid plans can go awry sometimes. If you’re having trouble connecting to your IoT device via SSH, here are a few things to check:
- Network Connectivity: Make sure your device is connected to the same network as your computer. You can test this by pinging the device’s IP address.
- Firewall Settings: If your device is behind a firewall, ensure that port 22 (the default SSH port) is open and accessible.
- SSH Service Status: Verify that the SSH service is running on your IoT device. You can do this by running the command "sudo systemctl status ssh".
If none of these solutions work, don’t panic. There are plenty of online resources and forums where you can seek help from the community.
Advanced SSH Techniques for RemoteIoT Devices
Once you’ve mastered the basics of SSH, you can start exploring more advanced techniques to enhance your workflow:
1. SSH Tunneling
SSH tunneling allows you to securely access services running on your IoT device, even if they’re not exposed to the internet. For example, you can use SSH tunneling to access a web server running on your device without exposing it to the public.
2. SSH Agent Forwarding
SSH agent forwarding allows you to use your local SSH keys to authenticate with other remote servers. This can be particularly useful if your IoT device needs to connect to other devices or services.
3. SSH Configuration Files
Instead of typing the same SSH commands every time, you can create a configuration file to simplify the process. This file, located at ~/.ssh/config, allows you to define aliases and default settings for your SSH connections.
Real-World Applications of SSH for RemoteIoT Devices
SSH isn’t just a theoretical concept—it’s a powerful tool with real-world applications. Here are a few examples of how SSH is used in the IoT space:
- Remote Monitoring: Companies use SSH to monitor the status of IoT devices in real time, ensuring that they remain operational and secure.
- Software Updates: SSH enables seamless software updates for IoT devices, reducing downtime and improving efficiency.
- Data Collection: Researchers use SSH to collect data from remote sensors and analyze it for scientific purposes.
These applications demonstrate the versatility and power of SSH in the IoT ecosystem. Whether you’re a hobbyist or a professional, SSH has something to offer.
Conclusion: Take Action Today!
And there you have it, folks—a comprehensive guide to mastering remote IoT device SSH management. By following the steps outlined in this tutorial, you’ll be able to securely connect to your IoT devices, troubleshoot issues, and manage settings with ease.
But don’t stop here! The world of IoT is constantly evolving, and staying ahead of the curve requires continuous learning and adaptation. So, take a moment to reflect on what you’ve learned and think about how you can apply it to your own projects.
And remember, the best way to solidify your knowledge is by doing. So, fire up your terminal, connect to your IoT device, and start exploring. Who knows? You might just discover something amazing along the way.
Got questions? Leave a comment below, and let’s continue the conversation. Happy SSH-ing!
Table of Contents
- Understanding RemoteIoT Device SSH Basics
- Setting Up SSH on Your RemoteIoT Device
- Connecting to Your RemoteIoT Device via SSH
- Common SSH Commands for RemoteIoT Devices
- Best Practices for Secure SSH Connections
- Troubleshooting Common SSH Issues
- Advanced SSH Techniques for RemoteIoT Devices
- Real-World Applications of SSH for RemoteIoT Devices
- Conclusion: Take Action Today!