Listen up, tech enthusiasts! If you're diving into the world of Raspberry Pi, you’ve probably realized that keeping an eye on its resources is crucial for smooth performance. Resource monitoring on Raspberry Pi isn’t just a good-to-have skill—it’s a must-have one. Whether you’re running a home automation system, a media center, or even a small server, knowing how your Pi is performing can make all the difference. So, buckle up, because we’re about to deep-dive into the ins and outs of Raspberry Pi resource monitoring.
Let’s face it, Raspberry Pi has become the go-to gadget for hobbyists, developers, and tech-savvy individuals worldwide. But with great power comes great responsibility—and in this case, it’s the responsibility to ensure your Pi stays healthy and efficient. Resource monitoring is like giving your Pi a regular check-up, and trust me, it pays off big time.
In this guide, we’ll break down everything you need to know about Raspberry Pi resource monitoring. From the basics to advanced techniques, we’ve got you covered. So, grab your favorite beverage, and let’s get started on this tech-savvy journey!
Read also:Lori Petty Wife The Fascinating Journey Of Robin Wright
Why Raspberry Pi Resource Monitoring Matters
Think of your Raspberry Pi as a mini-computer that’s always working hard behind the scenes. Just like any other computer, it needs care and attention to perform at its best. Resource monitoring helps you keep tabs on things like CPU usage, memory consumption, disk space, and network activity. It’s like having a dashboard that shows you exactly what’s going on under the hood.
Here’s the kicker: without proper monitoring, your Pi might start lagging, overheating, or even crashing. And who has time for that? By staying on top of resource usage, you can prevent issues before they spiral out of control. Plus, it’s just plain cool to know what’s happening inside your Pi.
Now, let’s look at some key benefits of Raspberry Pi resource monitoring:
- Improved Performance: Keep your Pi running smoothly by identifying bottlenecks.
- Prevent Overheating: Monitor temperature to avoid damage to your device.
- Optimize Resource Usage: Ensure your Pi is using its resources efficiently.
- Enhanced Security: Detect unusual activity that could indicate a security threat.
Getting Started with Raspberry Pi Resource Monitoring
Before we dive into the nitty-gritty, let’s cover the basics. To monitor your Raspberry Pi’s resources, you’ll need to have a few things in place. First, make sure your Pi is set up and running the latest version of Raspberry Pi OS. Next, familiarize yourself with the command line interface (CLI), as most monitoring tools rely on it.
Don’t worry if you’re new to the CLI—it’s not as scary as it sounds. In fact, once you get the hang of it, you’ll wonder how you ever lived without it. Most Raspberry Pi resource monitoring tools are free and easy to install, so you won’t break the bank getting started.
Here’s a quick checklist to help you get started:
Read also:Decoding Nj Mvc The Ultimate Guide To New Jersey Motor Vehicle Commission
- Install Raspberry Pi OS on your device.
- Update your system using
sudo apt updateandsudo apt upgrade. - Learn basic CLI commands like
top,htop, andfree.
Top Tools for Raspberry Pi Resource Monitoring
Now that you’re ready to roll, let’s talk about the tools you’ll need. There are plenty of options out there, but we’ve rounded up the best ones for you. These tools are user-friendly, powerful, and perfect for both beginners and pros.
1. htop
htop is a popular choice for Raspberry Pi resource monitoring. It’s like a souped-up version of the classic top command, with a more visually appealing interface. With htop, you can monitor CPU usage, memory consumption, and process activity in real-time. Plus, it’s super easy to install using the following command:
sudo apt install htop
2. Glances
Glances is another fantastic tool that gives you a comprehensive overview of your Pi’s resources. It provides detailed information about CPU, memory, disk usage, and network activity. What’s more, it supports exporting data to external services like InfluxDB, making it ideal for advanced users.
3. vnstat
If you’re concerned about network usage, vnstat is the tool for you. It keeps track of your Pi’s network traffic and provides detailed reports. Whether you’re monitoring bandwidth usage or troubleshooting connectivity issues, vnstat has got your back.
4. mpstat
For those who want to dive deeper into CPU performance, mpstat is a great option. It allows you to monitor CPU usage on a per-core basis, which is especially useful for multi-core Raspberry Pi models.
How to Install and Use Monitoring Tools
Installing monitoring tools on your Raspberry Pi is a breeze. Most of them are available in the default repositories, so you don’t need to hunt them down. Here’s a step-by-step guide to installing and using some of the most popular tools:
Installing htop
First, update your package list:
sudo apt update
Then, install htop:
sudo apt install htop
Once installed, simply type htop in the terminal to launch it. You’ll be greeted with a colorful interface showing all your Pi’s vital stats.
Installing Glances
Follow the same steps as above, but replace htop with glances:
sudo apt install glances
Launch Glances by typing glances in the terminal. You’ll see a dashboard with tons of useful information.
Installing vnstat
Install vnstat using:
sudo apt install vnstat
After installation, initialize the database:
sudo vnstat -u -i eth0
Replace eth0 with your network interface name if it’s different. Now, you can start monitoring your network usage.
Understanding Raspberry Pi Resource Metrics
Now that you’ve got the tools, it’s time to understand what all those numbers mean. Here’s a quick rundown of the most important metrics:
CPU Usage
CPU usage tells you how much of your Pi’s processing power is being utilized. A high CPU usage percentage can indicate that your Pi is working too hard, which might lead to performance issues.
Memory Consumption
Memory, or RAM, is another critical resource. If your Pi runs out of memory, it might start swapping data to disk, which slows things down. Keep an eye on memory usage to ensure smooth operation.
Disk Space
Running out of disk space is a common issue, especially if you’re storing large files or running multiple applications. Regularly check your disk usage to avoid surprises.
Network Activity
Network activity is crucial if you’re using your Pi as a server or media center. Monitoring network usage helps you identify bottlenecks and optimize performance.
Advanced Techniques for Raspberry Pi Monitoring
Once you’ve mastered the basics, it’s time to level up your Raspberry Pi resource monitoring game. Here are some advanced techniques to take your skills to the next level:
Setting Up Alerts
Why sit in front of your Pi all day when you can let it notify you when something’s wrong? Tools like Glances and vnstat allow you to set up alerts for specific metrics. For example, you can receive an email or push notification if your Pi’s CPU temperature exceeds a certain threshold.
Logging Data
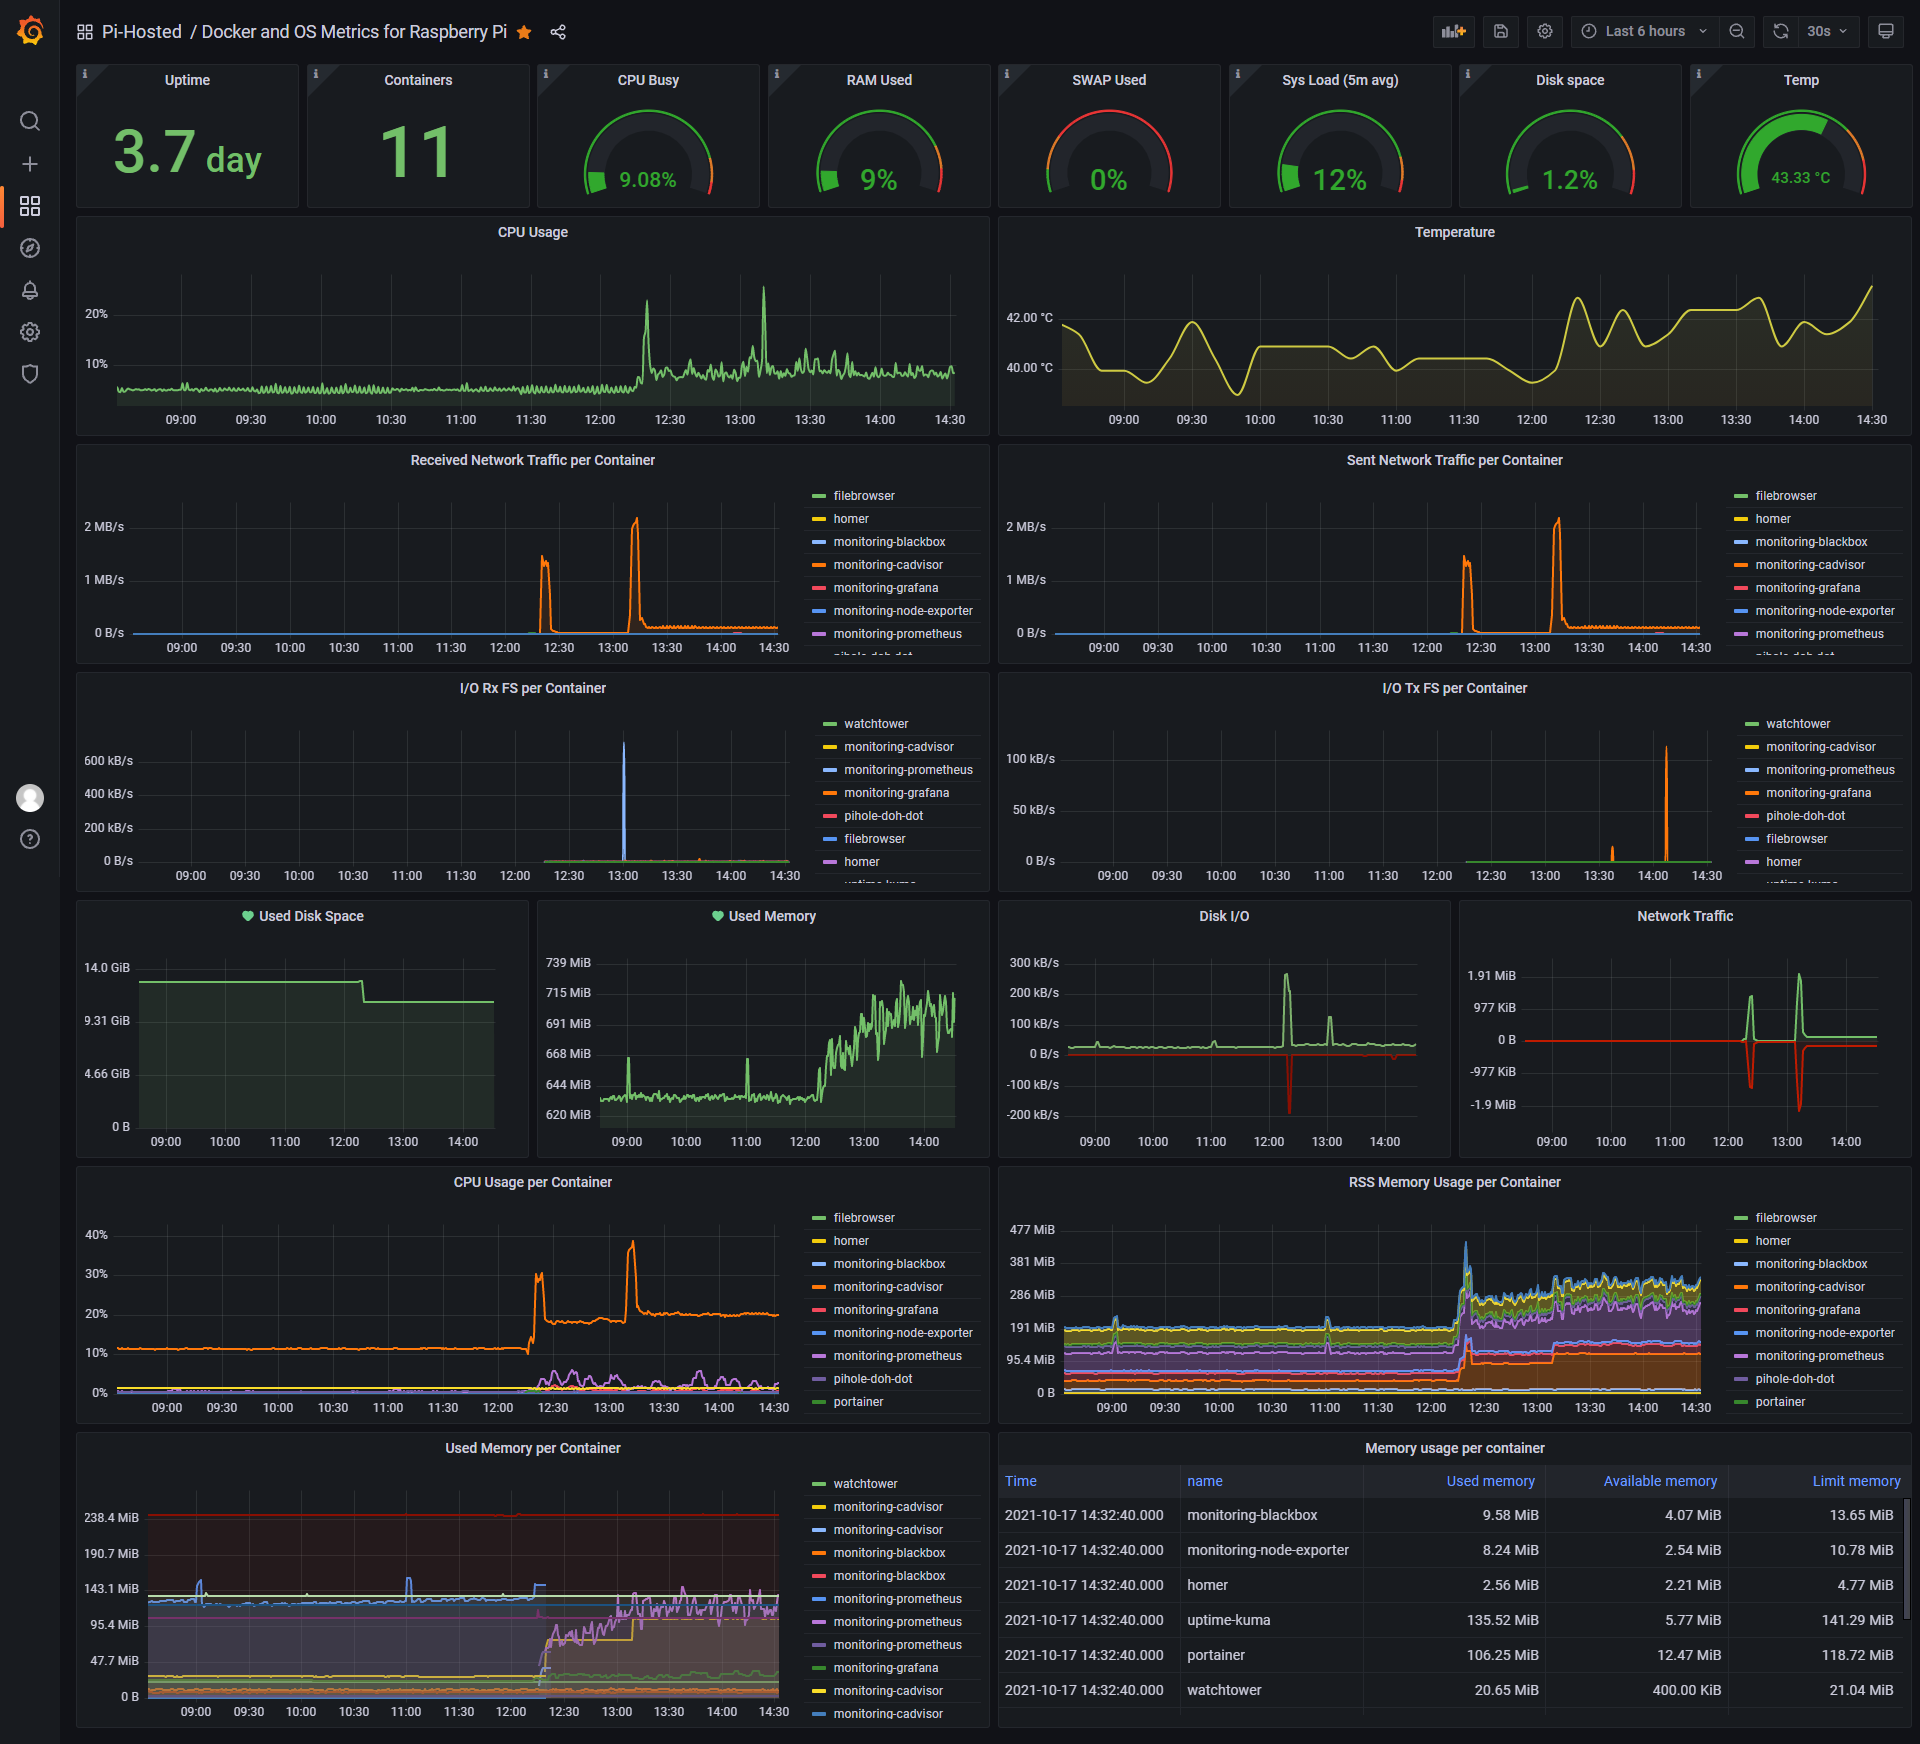
Data logging is a powerful way to track resource usage over time. Many monitoring tools support exporting data to external services like InfluxDB or Grafana. This allows you to create beautiful dashboards and analyze trends.
Automating Monitoring
Automation is the name of the game in the tech world. You can automate resource monitoring using scripts or cron jobs. For example, you can set up a script that checks disk space every hour and sends an alert if it falls below a certain threshold.
Troubleshooting Common Issues
Even with the best monitoring tools, issues can still arise. Here are some common problems and how to fix them:
Overheating
Overheating is a common problem, especially if your Pi is running heavy applications. To prevent this, consider adding a heatsink or fan to your setup. You can also monitor temperature using the vcgencmd command:
vcgencmd measure_temp
High CPU Usage
If your Pi’s CPU usage is consistently high, it might be time to optimize your applications. Check which processes are consuming the most resources and see if you can tweak them for better performance.
Running Out of Disk Space
Running out of disk space can bring your Pi to a screeching halt. Regularly clean up unnecessary files and consider expanding your storage if needed.
Best Practices for Raspberry Pi Resource Monitoring
To get the most out of your Raspberry Pi resource monitoring efforts, follow these best practices:
- Monitor regularly, not just when things go wrong.
- Set up alerts for critical metrics.
- Log data for long-term analysis.
- Optimize your applications for better performance.
- Keep your Pi and its software up to date.
Conclusion: Take Your Raspberry Pi to the Next Level
And there you have it, folks! Raspberry Pi resource monitoring isn’t just a cool skill—it’s essential for keeping your Pi running smoothly. By using the right tools, understanding key metrics, and following best practices, you can ensure your Pi stays healthy and efficient.
So, what are you waiting for? Start monitoring your Raspberry Pi today and take your tech game to the next level. And don’t forget to share your experiences in the comments below. Who knows, you might just inspire someone else to join the Raspberry Pi revolution!
Table of Contents
- Why Raspberry Pi Resource Monitoring Matters
- Getting Started with Raspberry Pi Resource Monitoring
- Top Tools for Raspberry Pi Resource Monitoring
- How to Install and Use Monitoring Tools
- Understanding Raspberry Pi Resource Metrics
- Advanced Techniques for Raspberry Pi Monitoring
- Troubleshooting Common Issues
- Best Practices for Raspberry Pi Resource Monitoring
- Conclusion